Edit 15/05/13: since the release of OpenELEC 3.0.2, Airplay has been working perfectly (and most of the other bugs have vanished too). Or maybe it's that I wired everything up with ethernet when 3.0.1 came out and wireless stopped working. And by "wired" I mean "nailed the cable to my doorframe". Either way, brilliant work from the XBMC and OpenELEC teams!
The Raspberry Pi is great. For about £25, and with the help of OpenELEC, I've got my whole media library hooked up to my TV - all in all, about 1.5TB worth of entertainment.

Yeah, the speaker placement sucks.
It consolidates all the different locations (in my case, hard drives and SMB shares) into a single library for each of TV and Movies, so I can chuck someone my phone or sit them in front of a browser and everything's right there in one place. Makes choosing what to watch much easier!
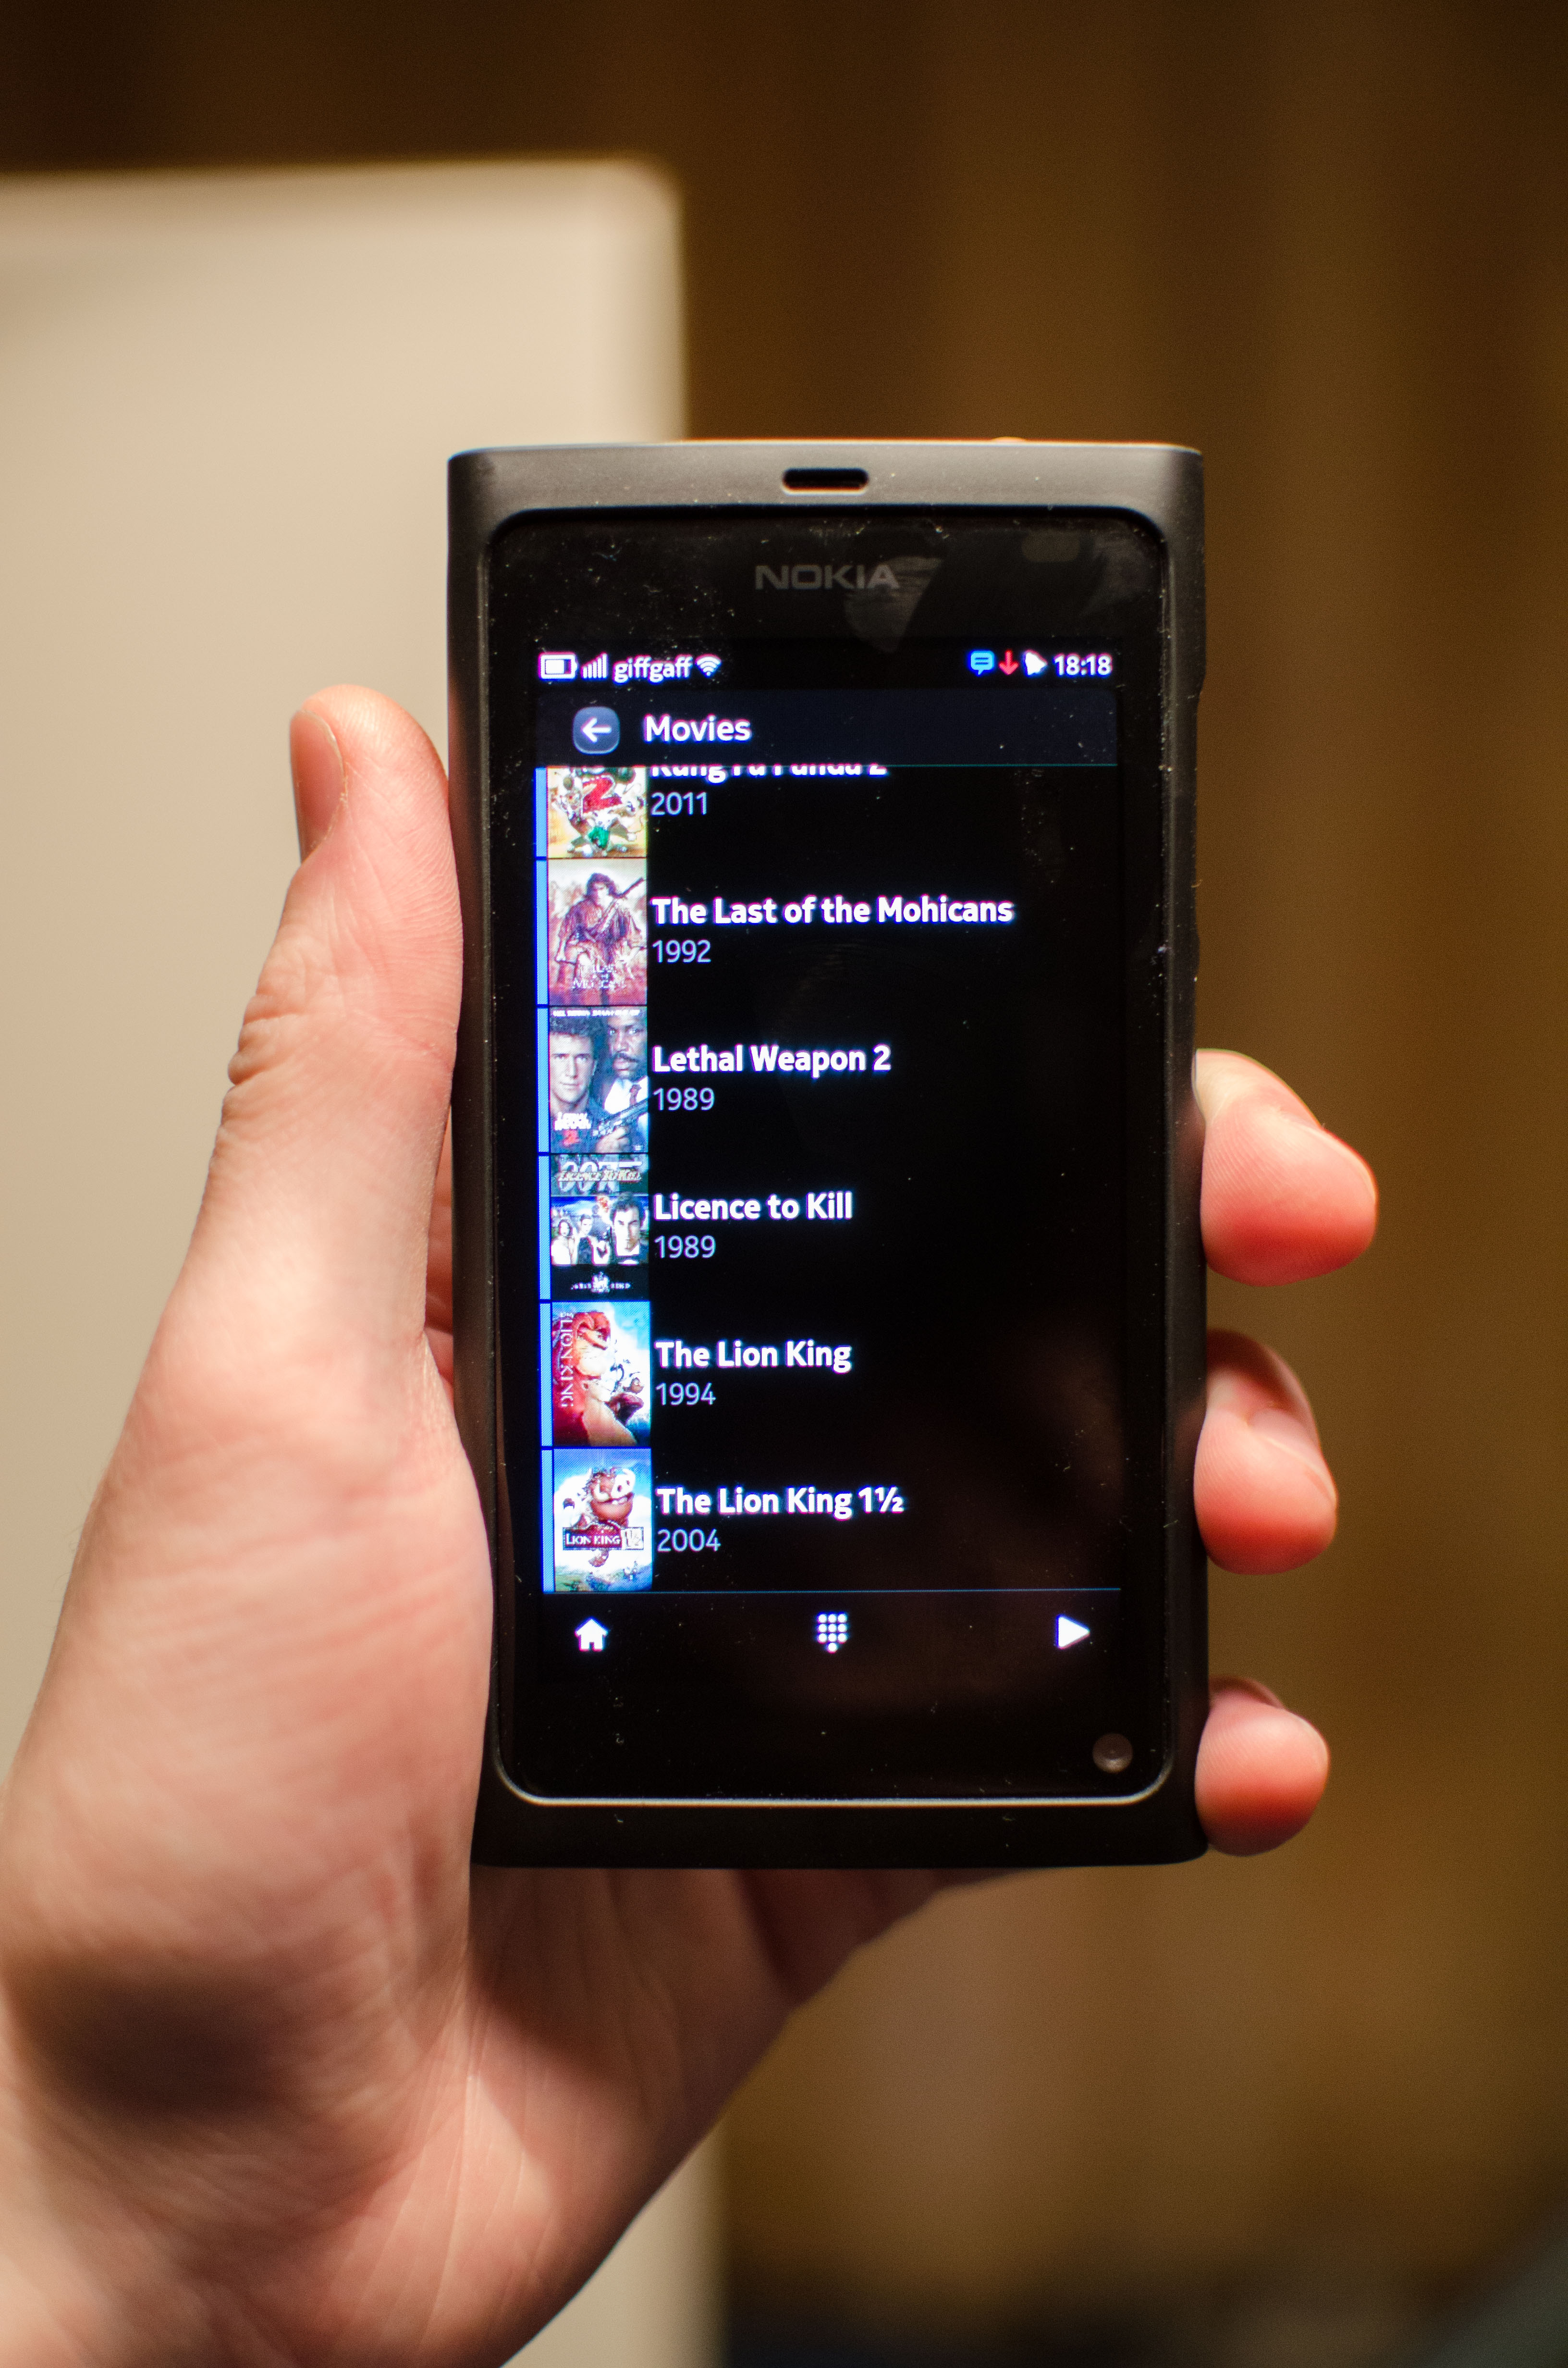
There's a great remote app available for the Nokia N9. Check it out!
The one thing I haven't imported is my music library - it's getting pretty huge now, and I think the Pi would struggle when checking for new content. So I decided instead to stream music directly from my computer. Since I'm too lazy to set up Foobar and thus am still using iTunes, I figured Airplay would be the best way to go - XBMC (and by extension OpenELEC) supports it out of the box. As an aside, there's an odd bug with iTunes 11 where it won't show the Airplay icon on first use - you have to switch to the mini player, choose the relevant output, then return to the full size player where it'll appear to the right of the volume slider.
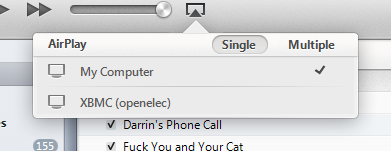
In any case, I could never get it to work properly, and it just stuttered all the time. Luckily XBMC supports a number of different streaming protocols, so I figured I'd try with VLC instead.
The first step to getting this to work was to get a Stereo Mix input on my sound card. If you use the generic Microsoft drivers that Windows Update picks up, you won't have this - I had to install the Realtek drivers from my motherboard manufacturer's website. It's also disabled by default, so right click on your sound icon, go to Recording devices, right click on some blank space and choose Show Disabled Devices. Click Stereo Mix, Properties, enable it, etc etc.
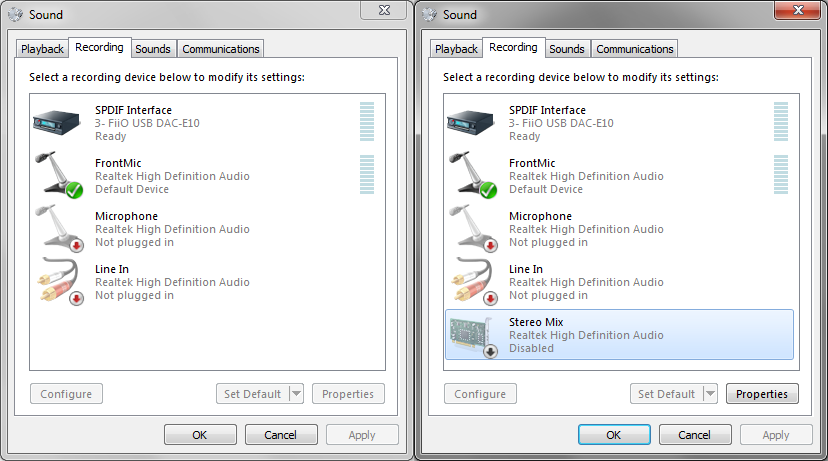
Annoyingly enough, the Stereo Mix only works if you set your default playback device to the sound card (I usually use a separate DAC/amp for my headphones, so have to switch them over). It also won't work if you don't have anything plugged in to said sound card, so either plug in some headphones or disable the front panel jack detection - you can do this in the Realtek HD Audio Manager in Control Panel (it's under Hardware and Sound). Click the yellow folder in the top right and tick the box.
Now that we've got Stereo Mix working, we need to set up VLC. Hit Ctrl+S to start the streaming wizard, go to Capture Device, and choose Stereo Mix as the audio device. Tick "show more options" at the bottom and copy the contents of the Edit Options box - you'll need it later. Hit Stream, then Next. You'll now need to set up a destination - I'd suggest either RTSP or HTTP. HTTP streaming has a longer delay than RTSP, but seems to be a bit more resistant to skipping. Click Add. You'll want to activate transcoding to avoid wasting too much bandwidth (Stereo Mix is uncompressed PCM), so choose an appropriate profile. I went for Audio - MP3 and bumped up the bitrate, but it's up to you. AC3 doesn't seem to work, which is unfortunate since the Pi could otherwise pass it through to your TV and save some processing power. Hit Next again, copy the generated stream output string, and click Stream to start it going.
To avoid having to go through all that whenever you want to stream, you can make a custom desktop shortcut for VLC which will start streaming for you. Set the target to something like this:
"C:\Program Files (x86)\VideoLAN\VLC\vlc.exe" dshow:// :dshow-vdev= :dshow-adev="Stereo Mix (Realtek High Defini" :live-caching=300 :sout=#transcode{vcodec=none,acodec=mp3,ab=192,channels=2,samplerate=44100}:rtp{sdp=rtsp://:8554/} :sout-keep
The bit in blue is the contents of Edit Options from earlier - you'll want to put double quotes around your sound device since the spaces will mess with it. The bit in green is the generated stream output string.
The easiest way to get it working on your Pi is to make a .strm file, which contains the address of the stream. It should contain something like "rtsp://192.168.1.69:8554/" or "http://192.168.1.69:8080/" (without quotes), where 192.168.1.69 is your computer's IP (it is static, right?). Save the file as whatever.strm and copy it to your Pi, then try opening it with XBMC to check it works.
That's all well and good, but having to find the .strm file whenever you want to stream is a bit annoying. If you're using the default Confluence skin, you can add another button to your home screen to do it for you. SSH into your Pi, and locate the skin folder. On raspbmc, it should be in /home/pi/.xbmc/addons/skin.confluence (or maybe .xbmc-current, I'm not too familiar with it). On openelec, it's a bit more involved. You'll find the skin folder in /usr/share/xbmc/addons/skin.confluence, but it's on a read-only file system, so you'll have to copy it to your user area. XBMC will look in both locations for skins, so you'll need to edit the copied version slightly so it'll appear as a separate option:
cp -r /usr/share/xbmc/addons/skin.confluence ~/.xbmc/addons
cd ~/.xbmc/addons
mv skin.confluence skin.confluenceedits
cd skin.confluenceeedits
nano addon.xml
Edit the id and name fields so they no longer match the original:
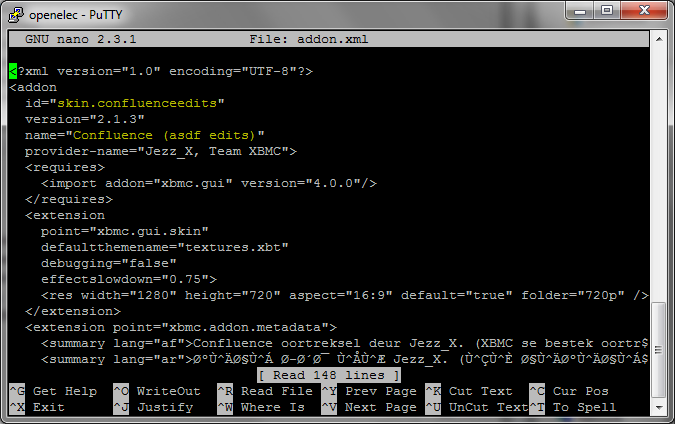
Change the highlighted bits to something unique.
Hit Ctrl+O then Enter to save, and Ctrl+X to exit. Now you'll need to edit Home.xml, which is found in the 720p folder:
cd 720p
nano Home.xml
Hit Ctrl+W to search, and type "item id" (no quotes) then enter. You'll want to add a new item with a unique ID. The rest is fairly self-explanatory:
<item id="69">
<label>Stream Music</label>
<onclick>PlayMedia("/storage/music/Stream from Hector.strm")</onclick>
<icon>-</icon>
<thumb>-</thumb>
</item>
Obviously you'll want to change /storage/music/Stream from Hector.strm to wherever yours is located.
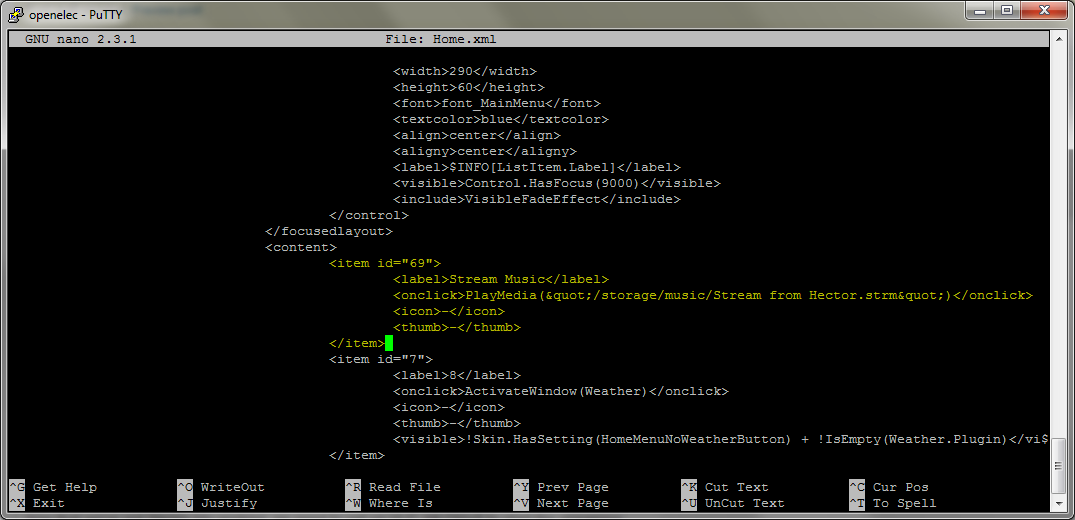
If you want the button in a different place, you can put it below the existing items.
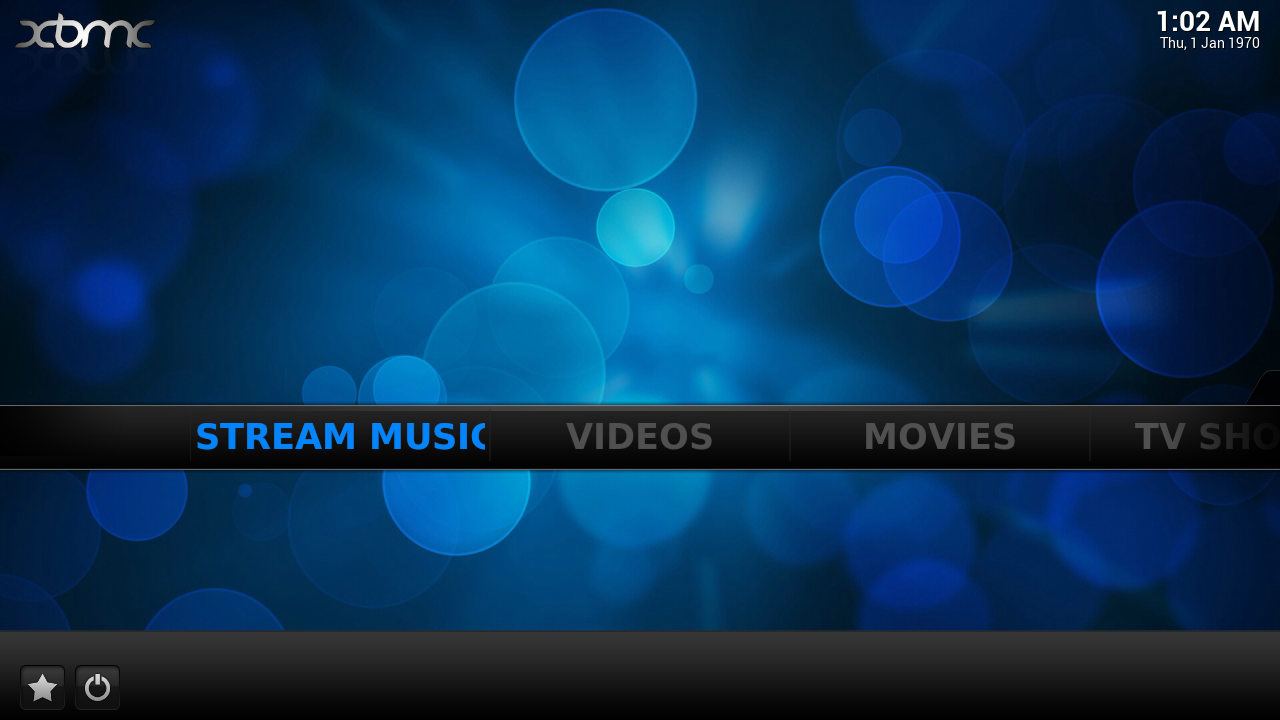
Restart XBMC, change your skin to the edited one (or not, if you're using Raspbmc), and your new button should appear. Hooray!
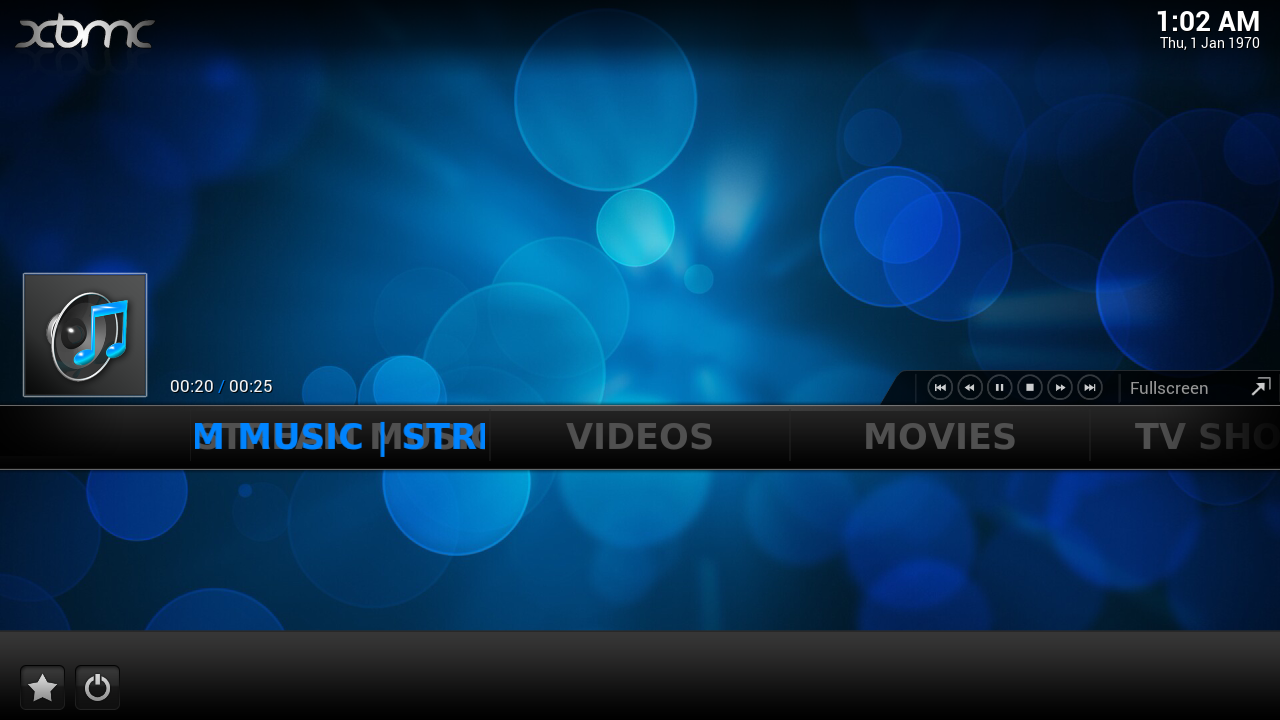
And here's what it looks like when it's playing (yeah, the background doesn't really keep up):
And that's it! I've been streaming now for a good few hours without issue, so hopefully it should stay that way. Leave a comment or email me at hello @ this domain if you're having trouble getting it to work!
Thanks for this, it works great
Pingback: Setting up the Xbox 360 DVD remote with OpenELEC | asdfghjkl;'#