Author Archives: asdfghjkl

Disabling/enabling AES (power saving) programmatically on Victron inverters with Node-RED

Want to do this yourself? Grab everything you need from my Github!

Living off-grid means we have to be pretty careful with our electricity usage, especially in the winter when solar output can be a tenth of the summer highs. We don't have a huge number of mains appliances (fridge, laptops, coffee grinder, blender) and run as much as possible off 12 volts. Despite this, I honestly don't think we're missing out on anything! We use around 1kWh of electricity per day, just an eighth of the average UK household that Ofgem reckons uses 2900kWh each year.

One reason I chose to install Victron gear is that I am simply too lazy to turn an inverter on and off whenever I want to use mains power. Their inverters have a power-saving function they call AES (automatic economy switch), which keeps the inverter off and blips the power every second to see if a load is connected. If it detects a load, it switches on fully. This does restrict your choice of appliances to those without too many electronics, but for a fridge with an old-school bimetallic strip thermostat it works great.

The energy savings from using this "search mode" can be quite significant. My Multiplus 1600W inverter uses 10W when switched on with zero load, and 3W in power saving mode. Just considering the fridge, it tends to run in a 1-hour-off, 20-minutes-on cycle. So that's 18 fridge cycles per day, saving 7W * 18 hours = 126Wh compared to the inverter being left on 24 hours per day. That works out to an eighth of our average daily consumption saved. It's a much bigger deal in the winter, where the average day only gives us around 250Wh of solar power, so we're saving fully half of that!

The only downside is that picking the wattage thresholds to turn on fully can be quite finicky. These inverters don't have a current transformer on the AC output, so the power usage they report is just an estimate based on battery current and efficiency. Reactive vs resistive loads will also skew this figure. Choosing the threshold takes a bit of experimentation to pick the lowest wattage where the inverter will go into power saving with no load, but still switch on when something's plugged in. This seems to vary between inverters, but a good place to start is 25W and work upwards until it works well. Mine is just about right at 35W start and 67W stop (in reality this means a 10W load will keep the inverter on).

It's still not quite perfect, though. I noticed that newer USB-C laptop chargers will draw just a few watts to begin with, ramping up to full power after about 10 seconds. Since the "blips" in search mode only last for one AC cycle, they don't draw enough power to fully turn on the inverter before they reset. My lazy solution was to run the coffee grinder for a few seconds, but ideally I'd like to briefly disable AES, allowing the charger to ramp up before re-enabling it.

I've been playing with Node-RED a lot recently, so I figured I could find a programmatic solution. Problem is, there's a (sensible) divide in what Victron lets you access externally - you can change state but not settings, and AES is a setting so no dice. Luckily I came across this hacky workaround, which uses a digital input on the inverter to control the AES setting. The solution is described almost entirely there but took a lot of searching and keyword massaging to find, hence why I'm writing about it here!

Alright, enough backstory. This isn't a recipe website. tl;dr:

  • Add a relay to your GX device
  • Connect the relay to an input on the inverter
  • Add assistants to the inverter to use the input state to disable AES
  • Find some cute way to trigger the relay

First things first is the relay. I run Victron's Venus OS on a Raspberry Pi, so an external relay module is needed (GX devices have one or more built in). By default the Pi build only comes with one relay output, assigned to GPIO21 (pin 40), and I was already using that for my heating. Easy solution: install Kevin Windrem's SetupHelper then RpiGpioSetup, adding 5 more relays (though only 4 total are accessible through Node-RED).

I then switched out my 1-relay module with a 4-relay one. For single relay modules, it seems like any old 5v relay module will do (they must be powered by 5v, but a 3.3v GPIO will trigger it). But when you go larger, you have to be careful - many of these seem to be active-low rather than active-high, and additionally require 5v to trigger them. Active-low doesn't work for Venus OS, as during the Pi's startup your relay will be turned on even if you invert its output later. So when you're looking for a relay module, avoid ones with a "JD-VCC" jumper (these require modification to work with 3.3v signals) and pick one with a set of configurable active-low/high jumpers (mine are labelled LOW-COM-HEIGHT, ha!).

Connect DC+ to the same 5v power supply as your Pi, DC- to ground, and IN1 to IN4 to the GPIO pins. If you're using the RpiGpioSetup package, these will be GPIO21, 17, 27 and 22 (header pins 40, 11, 13 and 15). The full list is here. Make sure the low/high jumpers are set to high.
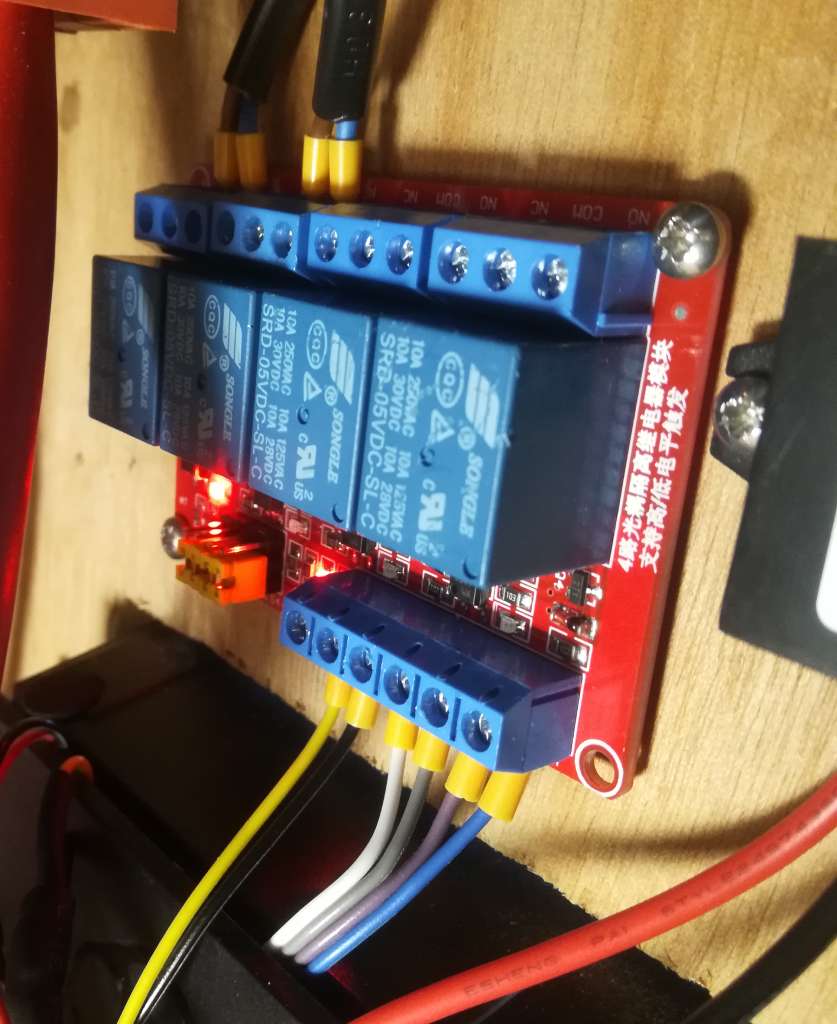
Installing the 4-channel relay module

Next, set up the inverter. My Multiplus 1600 is a smaller model without digital inputs, but it does have an input for a battery temperature sensor which can be reconfigured. Since mine is connected to the Pi via a VE.Bus to USB cable, it uses data from the battery monitor for temperature-compensated charging, so this input is spare.

You can use Victron's VEConfigure software over USB, but if it's connected to the Pi it's much easier to configure remotely through the VRM. Go to Device list -> Remote VEConfigure and click Download to get the config file. Open VEConfigure, choose Port selection then Fake target from file and pick the downloaded file.

First, go to the Virtual switch tab and set Do not use VS (it's incompatible with assistants). Then, go to Assistants, add a General flag user and click Start assistant to configure it. Do the same again to add two Programmable relays. Configure them as follows:
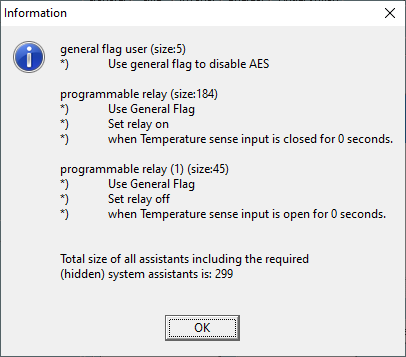
General flag user:
- Use general flag to disable AES
Programmable relay:
- Use general flag
- Set relay on
- When temperature sense input is closed for 0 seconds
Programmable relay:
- Use general flag
- Set relay off
- When temperature sense input is open for 0 seconds

The "general flag" is a virtual switch that you can use to activate various features. Here, we use it to disable AES when it's "on". We then use a programmable relay to activate the flag when the temperature sense input is shorted, and another to deactivate it when it's open-circuit.

Close VEConfigure (don't use the save function in the menu), and save the file when prompted. Go back to the VRM, click Upload and choose the file. The inverter will reset a couple of times.

Now, connect the relay (COM and NO) to the temperature sense input. Either way round is fine. Use a small screwdriver to press in the orange tabs so you can insert the wires. I recommend ferrules if you want it to look neat!

Connecting the relay to the temperature sense input

The simplest solution would have been to connect a switch or button to the input to disable AES - flick the switch or hold the button for a few seconds until the load picks up. But since we're in it already, let's add a couple of buttons to our Node-RED dashboard.

Node-RED flow

As usual, this is more complicated than it needs to be. You can grab the completed flow from my Github. I added two buttons, one for 1 minute and one for 1 hour. These activate trigger nodes, which send false immediately, then true after the specified time. false and true go to a change node, which sets msg.enabled from the payload and feeds this back to the buttons, disabling them until the timer runs out. They also go to a function node, which converts false to 1 and true to 0, activating the relay. I also added a relay state node which displays on the dashboard whether AES is on or off. Finally, I added a node which runs 0.1s after startup, turning off the relay and enabling the buttons in case the timer has been cancelled by a restart. Here's what it looks like in the dashboard:

Dashboard with AES on
Dashboard with AES off

And that's it! As always, drop a comment if you have any questions or made anything cool out of it 🙂

Run your Webasto from the internet with Victron’s Venus OS and Node-RED

Want to do this yourself? Grab everything you need from my Github!

If you live on a narrowboat, you'll definitely be used to being quite cold in the winter. There's not much worse than coming home late at night and knowing you're either going to have to spend an hour lighting the stove or go to bed wearing six layers!

Luckily, the previous owners of our boat were merciful and installed a Webasto diesel heater with radiators. We put a multi-fuel stove in anyway as a) it's very cosy and b) I don't trust it not to die in the middle of winter, but having the option of just clicking a button for heat saves a lot of admin. The only problem is, you need to be physically there to turn it on, which doesn't help you when you're on your way home and your house loses heat like a metal tube sitting in water. If you're in a house, you can of course just install a Nest or Hive or whatever. But everything is harder with 12 volts!

Last year I tore out the elderly electrics and batteries and installed the solar system of my dreams. Victron make a lot of fancy kit, but what I was most looking forward to was getting it all on the internet so I could stare at the battery voltage all day like the sad man I am. They make a range of GX devices to achieve this, but they go for hundreds. The good news is you can instead install their Venus OS on a Raspberry Pi, the bad news is the component shortage meant I had to wait an entire year to get hold of one.

Once I had everything hooked up, touchscreen and internet connection and all, the next step was to connect it to the heating. The most basic setup would be to use the built-in relay output and turn it on and off using the VRM control panel, but I wanted it a bit smarter so I didn't forget to turn it off (and ruin my batteries) or run it when the batteries are low (and ruin my batteries). Enter Node-RED, a simple but powerful way to virtually wire together devices and make lovely dashboards. It's included with the Venus OS large image and interacts with Victron kit out of the box so all I needed to do was put it together!

5V relay module
Installing the 5V relay module

Connecting to the heater was simple enough. I grabbed a cheap 5V relay module off eBay, and hooked it up to 5V power and GPIO21 (pin 40) on the Pi. The stock Webasto timer uses its own relay to connect the A1 and A2 pins together, supplying 12V to the black wire on the wiring loom which turns on the heater. I duplicated this, connecting the NO and COM pins on the relay module to A1 and A2 so I could still use the existing timer if needed.

Timer connections
Connecting to the stock timer (yellow-ferruled wires connect to NO and COM on the relay module)

I also installed a DS18B20 temperature sensor to keep an eye on the bedroom temperature. This integrates with the Pi and Victron's VRM using SetupHelper and VenusOS-TemperatureService: just connect it to 5V power (not forgetting to wire a 4.7K resistor between the + and signal pins) and GPIO 4 (pin 7) on the Pi.

Node-RED flows

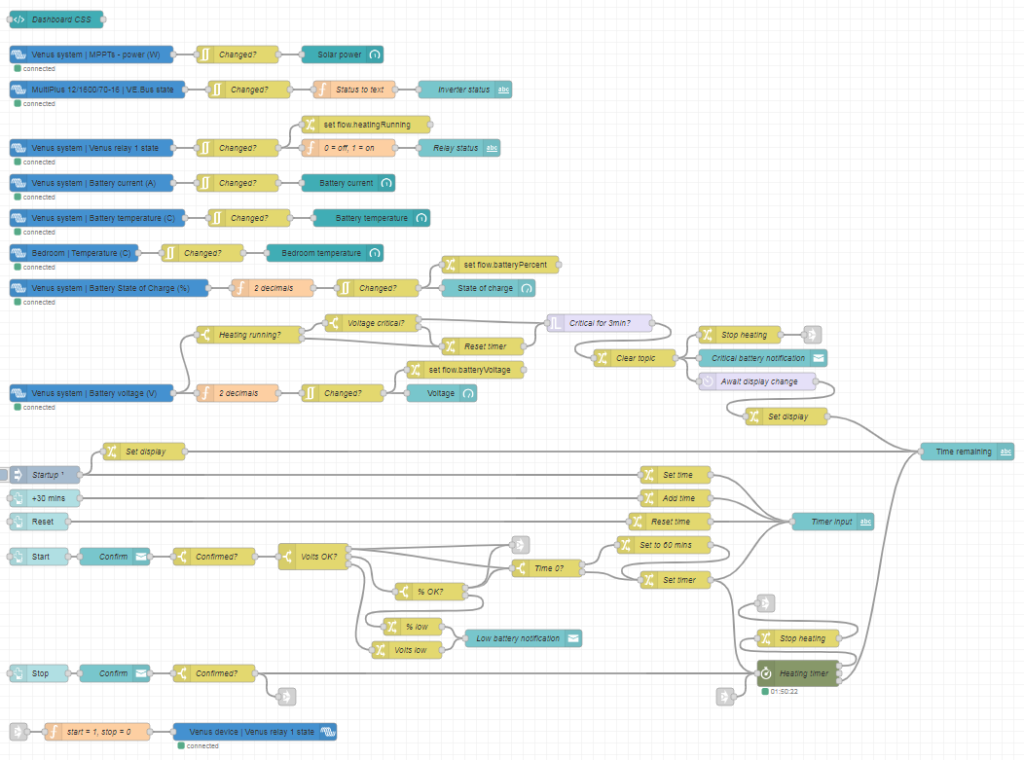
Next up was the Node-RED flows. I overcomplicated this a bit for extra features and a nice dashboard, so I'll go through it bit by bit. If you want your own, you can grab the file and install instructions from my Github.

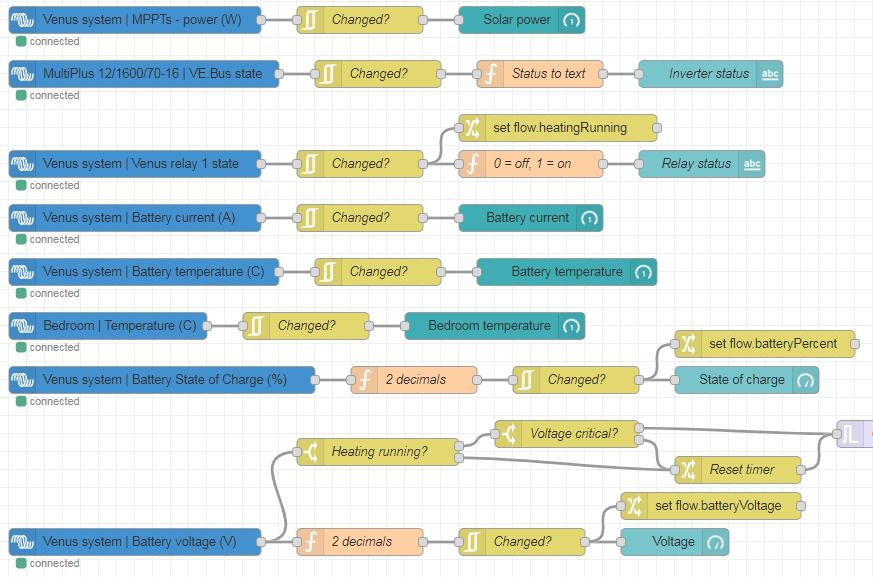
The built-in Victron nodes let you query and control all of your connected devices. I have a SmartShunt battery monitor and SmartSolar MPPT controller, both connected to the Pi by VE.direct to USB cables, and a Multiplus inverter, connected with a VE.bus to USB cable.

Victron nodes

The Victron nodes (blue) feed into dashboard nodes (teal). They push data every 5 seconds, or immediately on change, so first I filtered them to only update if they've changed. I also applied a couple of functions to convert numerical status to text, or reduce the number of decimal places. The relay status, state of charge and battery voltage nodes also set flow-context variables that are used elsewhere.

Heating control nodes

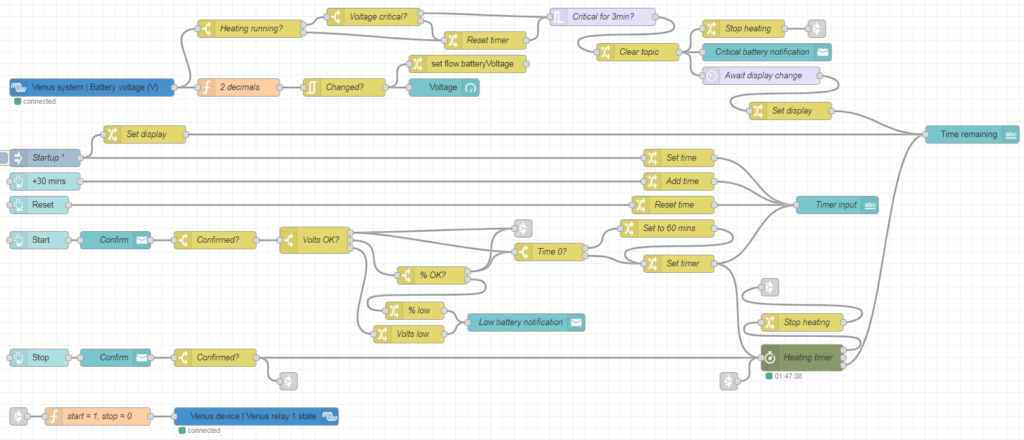
Next we have the heating controls. These are based around a timer node from node-red-contrib-stoptimer-varidelay. The +30 mins and Reset buttons edit a timer display, which is stored in another flow-context variable and pushed to the timer itself with the Start button. This also activates the heater relay. When the timer runs out, the relay is turned off again. The Stop button disables the heater relay and cancels the timer immediately. The Start and Stop buttons include a confirmation dialog to avoid inadvertently pressing them.

I also wanted to include some battery monitoring. The Webasto has its own low-voltage cutout, but this is set to something like 10.6V at which point your batteries are probably already wrecked. It's important to shut it down properly so it can clear the combustion chamber and cool down, so the safest way is to turn off the signal relay and let it finish up. When Start is pressed, I first check the battery voltage from the flow-context variable. If it's above 12.9V, the battery must be charging so we can skip the charge % check and start immediately. If it's between 12.1V and 12.9V, we move on to check the charge % (I like to check both as they get out of sync in winter when it's not fully charging every day). If it's over 55% (since you don't want to discharge lead-acid below 50%), we're okay to run. If the battery voltage is under 12.1V or charge % is under 55%, we pop up a notification and don't turn the heater on.

Battery checks while running

I also wanted to check the battery voltage while running: it's all well and good checking it at startup, but what if it gets dangerously low a few hours later? If the battery voltage drops below 11.85V while running and maintains that for 3 minutes, the heater will turn off.

I implemented this in the battery voltage flow. Each time the voltage updates, it will check if the heating is running. If so, it will check if the voltage has dropped under the critical level, and if so, will start a 3-minute timer. If the voltage rises again during this time, it will send a message to reset (i.e. cancel) the timer. This is important as the inverter or water pump starting up can cause the voltage to briefly drop under the critical level – but this doesn't mean the battery is empty!

I also included a connection from "Heating running? -> No" to the timer reset to avoid a race condition when the heating switches off. The "Heating running" switch checks the relay status, which doesn't update quite instantly when it changes. It was therefore possible that the 3-minute timer could start again, when the heater had already switched off but the relay status hadn't updated yet, thus sending another switch-off signal and notification 3 minutes later. The extra connection cancels the timer once the relay status has updated.

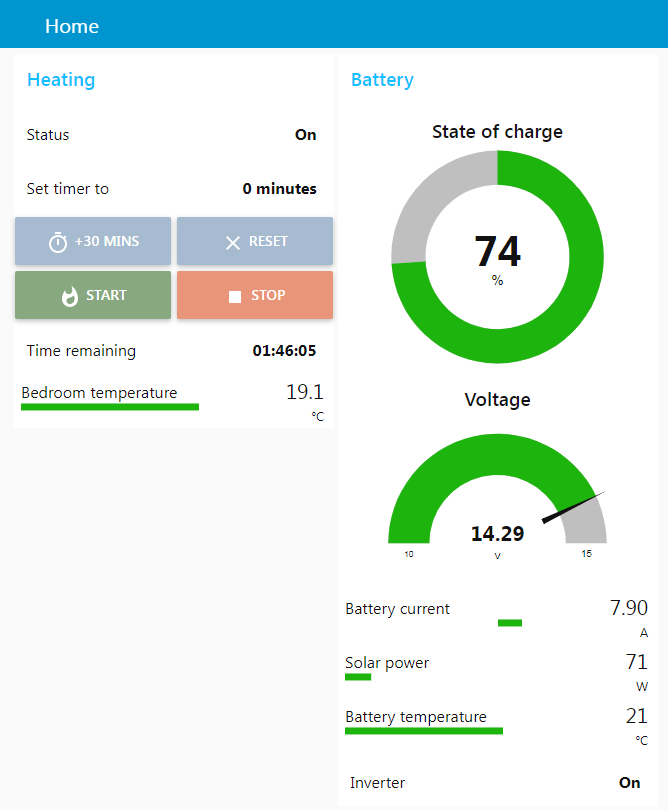
The final step was to put everything together into a nice dashboard. This uses the node-red-dashboard package, and node-red-contrib-ui-artless-gauge for some nice skinny gauges. I also added a tiny bit of CSS in a template node to make the confirmation dialogs look a bit nicer:

<style>
    .confirm-dialog .md-title {
        display: none;
    }
    .confirm-dialog .md-dialog-content-body {
        padding: 1em;
    }
</style>Code language: CSS (css)

And this is the final product!

Node-RED dashboard

The dashboard is accessible locally at https://venus.lan:1881/ui, or online via the Victron VRM (choose Venus OS Large from the left hand menu, then Node-RED Dashboard). So now all I need to do is flick the heating on an hour or so before I get home, and arrive to a toasty boat!

If you've done something similar, I'd love to see it! Drop a comment below 🙂

Archiving everything I like with youtube-dl

Continuing on the theme of "link rot bad, hard drives cheap", a year or so ago I started archiving videos I'd liked or saved to YouTube playlists. You can do this manually without too much trouble but I chucked it in a shell script to run regularly, keeping as much metadata as possible. Here it is!

#!/bin/bash

# Archive youtube videos from a list of channels/playlists, in up to selected quality,
# with formatted filenames and all available metadata in sidecar files.
#
# Note: this probably relies on having an up-to-date youtube-dl, so we run
# youtube-dl -U in the root crontab an hour before this script runs

# Settings
quality='bestvideo[height<=?1080]+bestaudio/best[height<=?1080]'
# If we ever get infinite hard drive space:
#quality='bestvideo+bestaudio/best'
# Batch file of URLs to download
batch_file='youtube-list.txt'
# File to pull youtube cookies from (for private videos and liked playlist)
cookies_file='youtube-cookies.txt'
# Don't download anything absurdly-sized at all (if prefer to download but in worse quality,
# add to quality definition instead like [height<=?1080][filesize<10G]
max_filesize='10G'
# Clone current useragent (that account is logged in as)
user_agent='Mozilla/5.0 (Windows NT 6.1; Win64; x64) AppleWebKit/537.36 (KHTML, like Gecko) Chrome/83.0.4103.116 Safari/537.36'
# Bind to different IP in case of geo-blocks
# Country 1
source_IP='111.111.111.111'
# Country 2
#source_IP='222.222.222.222'
# ipv6 1 (etc)
#source_IP='2000:aaaa:b:cccc::'
# Limit download rate and sleep a random number of seconds between downloads to avoid IP blocks
rate_limit='5M'
sleep_min='10'
sleep_max='15'
# Set folder and filename format, and an archive file to avoid redownloading completed videos
filename_format='youtube/%(playlist)s/%(playlist_index)05d - %(title)s - %(id)s - %(upload_date)s.%(ext)s'
archive_file='youtube/youtube-dl-downloaded.txt'

# Change to directory this script is in (for cron etc)
cd $(dirname $0) || { echo 'Failed to change directory, giving up'; exit 1; }                              

# Explanations
#-sv: simulate verbose for testing
#--playlist-items 1-3: first few only for testing
#--restrict-filenames: replace special characters in case need to transfer to Windows etc
#--no-overwrites: do not overwrite existing files
#--continue: resume partially downloaded files
#--ignore-errors: continue even if a video is unavailable (taken down etc)
#--ignore-config: don't read usual config files
#--download-archive $archive_file: use an archive file to avoid redownloading already-downloaded videos
#--yes-playlist: download the whole playlist, in case we pass a video+playlist link
#--playlist-reverse: may be necessary if index starts from most recent addition?
#--write-description: write video description to a .description file
#--write-info-json: write video metadata to a .info.json file
#--write-annotations: write annotations to a .annotations.xml file, why not
#--write-thumbnail: write thumbnail image to disk
#--write-sub: write subtitles (but not autogenerated)
#--embed-subs: also add them to the video file, why not
#--add-metadata: add metadata to video file

# Use --cookies to temporarily pass cookies (note must be in UNIX newline format, use notepad++ to convert)
# fix youtube-dl not working with cookies in python2
# https://github.com/ytdl-org/youtube-dl/issues/28640
python3 /usr/bin/youtube-dl \
--cookies "$cookies_file" \
--batch-file "$batch_file" \
--output "$filename_format" \
--format "$quality" \
--user-agent "$user_agent" \
--source-address "$source_IP" \
--max-filesize "$max_filesize" \
--limit-rate "$rate_limit" \
--sleep-interval "$sleep_min" \
--max-sleep-interval "$sleep_max" \
--restrict-filenames \
--no-overwrites \
--no-warnings \
--continue \
--ignore-errors \
--ignore-config \
--download-archive "$archive_file" \
--yes-playlist \
--playlist-reverse \
--write-description \
--write-info-json \
--write-annotations \
--write-thumbnail \
--write-sub \
--sub-lang en \
--embed-subs \
--add-metadata

Code language: Bash (bash)

You'll need the wonderful youtube-dl to run this. Should be fairly self-explanatory, but there's a few bits I find especially useful.

I limit video quality to the best up-to-1080p possible, since 4K videos can be huge and I'm not fussed for an archive. I also put a hard limit on filesize to avoid downloading any 10-hour videos, but you have the option to get them in lower quality instead. I keep the URLs to download in a separate file: these can be individual videos, entire channels or playlists, one on each line.

You can make your own playlists unlisted if you don't want them public but still want to be able to download them with this script. Unfortunately there is one case where this doesn't work – your liked videos playlist is always private and can't be changed. youtube-dl does let you pass in the username and password to your Google account but I find this rarely works, so instead you can export your YouTube cookies (using something like this extension on a YouTube page), dump them in a .txt file and point youtube-dl to them. It's probably sensible to clone your browser's useragent too, and set some rate limits to not abuse their hospitality too much.

Since some videos will inevitably be geo-restricted and I have a few IPs pointing to my box that geolocate to different countries, I'll occasionally let it do a run from somewhere else to sweep up any videos that might have been missed.

Although I save metadata anyway, I try to make the output format descriptive enough that I could live without it. I save each video to a folder named for its playlist/channel, and name the video with its position in the playlist, title, video ID and upload date. Reversing the playlist order means the position index starts from the first video added to the playlist – otherwise when more videos are added, the latest becomes the new number 1 and your index becomes useless.

Next post: doing something with them!

Checking a webpage (or sitemap) for broken links with wget

As the internet gets bigger, link rot gets badder. I still have a gigantic folder of bookmarks from pages I liked on StumbleUpon over a decade ago, and it's sad to see how many of them now lead to nowhere. I've been making a real effort over the past couple of years to archive the things I've enjoyed, but since nobody lets you know when a little blog drops offline, I wanted something that could occasionally scan through the links on my websites and email me when one breaks so I could replace it if possible.

There are plenty of free and commercial products that already do this, but I prefer the big-folder-full-of-shell-scripts approach to getting things done and this is an easy task. To download a webpage, scan it for links and follow them to check for errors, you can run the following wget command:

wget --spider --recursive --execute robots=off --no-directories --no-verbose --span-hosts --level 1 --timeout 10 --tries 1 https://urlCode language: Bash (bash)

I've written all the arguments in long form to make it a bit easier to read. The --spider option just checks pages are there instead of downloading them, but it still creates the directory structure so we also add --no-directories. To make it follow the links it finds, we use --recursive, but set --level 1 so it only goes one level deep. This is ideal for me as I only want to run my script against single webpages, but play with the number if you need more. For example, to automate this across your whole site, you could grab the sitemap.xml with wget, extract the URLs then pass them back to wget to scan each in turn (edit: see the bottom for an example). But back to what we're doing: we also need --span-hosts to allow wget to visit different sites, and --no-verbose cuts out most of the junk from the output that we don't need. Finally, we add --timeout 10 --tries 1 so it doesn't take forever when a site is temporarily down, and --execute robots=off because some sites reject wget entirely with robots.txt and it politely complies. Maybe it's a bit rude to ignore that, but our intent is not to hammer anything here so I've decided it's okay.

Our wget output is still quite verbose, so let's clean it up a bit:

wget --spider --recursive --execute robots=off --no-directories --no-verbose --span-hosts --level 1 --timeout 10 --tries 1 https://url | grep --before-context 1 --no-group-separator 'broken link!' | grep --invert-match 'broken link!' | sed --expression 's/:$//'Code language: Bash (bash)

When wget finds a broken link, it returns something like this in the output:

https://asdfghjkl.me.uk/nonexistent:
Remote file does not exist -- broken link!!!

The first grep only matches lines containing "broken link!". This isn't very helpful on its own, so we add --before-context 1 to also return the line with the URL immediately above. With this option grep puts a line with "--" between matches, which we turn off with --no-group-separator so it looks cleaner. We then pipe through grep again but this time match the inverse, to remove the "broken link!" lines we no longer need. And just to be pendantic, we finally run our list of URLs through sed to remove the colon from the end of each URL ($ matches the end of a line so it leaves the https:// alone).

We're now left with a list of links, but we're not quite done yet. We want to automate this process so it can run semi-regularly without our input, and email any time it finds a broken link. We're also currently only looking for HTTP errors (404 etc) – if a whole domain disappears, we'd never know! So let's wrap the whole thing in a shell script so we can feed it a URL as an argument:

#!/bin/bash
# check for arguments
if [[ $# -eq 0 ]]; then
	echo 'No URL supplied'
	exit 1
fi

# scan URL for links, follow to see if they exist
wget_output=$(wget --spider --recursive --execute robots=off --no-directories --no-verbose --span-hosts --level 1 --timeout 10 --tries 1 $1 2>&1)
# if wget exited with error (i.e. if any broken links were found)
if [[ $? -ne 0 ]]; then
	echo -e "Found broken links in ${1}:\n"
	# check for broken link line, return one line before, remove broken link line, remove colon from end of url
	echo "$wget_output" | grep --before-context 1 --no-group-separator 'broken link!' | grep --invert-match 'broken link!' | sed --expression 's/:$//'
	# same again, but for failure to resolve
	echo "$wget_output" | grep 'unable to resolve' | sed --expression 's/^wget: //'
	# exit with error
	exit 1
fi

# otherwise, exit silently with success
exit 0
Code language: Bash (bash)

I saved this as check_links.sh and made it executable with chmod +x check_links.sh, so it runs as ./check_links.sh https://url. Here's how it all works:

We first check the number of arguments ($#) supplied to the script. If this is zero, no URL was supplied, so we exit with an error. We then run our wget command, feeding in the first argument to the script ($1) as the URL and saving its output to the variable wget_output. wget by default outputs its messages to stderr rather than stdout, so we add 2>&1 to redirect stderr to stdout so it'll end up in our variable. I could never remember what order these characters went in, so I'll break it down: 2 means stderr, > means "redirect to a file" (compare to |, which redirects to a command), and &1 means "reuse whatever stdout is using".

We separated out wget from the rest because we want to now check its exit code. If it didn't find any broken links, it'll exit successfully with code 0. If it did, it'll exit with a different number. We compare the exit code of the last-run command ($?) with 0, and if they don't match, we can continue cleaning up its output. If they do, there's nothing more we need to do, so we exit successfully ourselves.

First we return the URL that was fed to the script, because we'll be running this on a schedule and we want our emails to say which page they were looking at. We use ${1} instead of $1 so we can put characters immediately after the variable without needing a space in between. \n adds an extra newline, which requires that echo be called with -e. We then send our output through the same series of greps as before. Something I didn't realise was that running echo "$variable" keeps the line breaks intact, whereas echo $variable strips them out (the difference between running it with one tall parameter, or a separate parameter for every line). You learn something new every day!

We also wanted to cover domains disappearing entirely. When wget can't resolve a domain, it leaves a one-line message like wget: unable to resolve host address ‘asdfghjkladssaddsa.com’. We run through our output again and use sed to take the wget: off the front (^ matches the start of a line), leaving behind a nice descriptive message. We can now exit with code 1, indicating that an error occurred.

To run this on a schedule, cron has us covered. Run crontab -e to edit your user's crontab, and add something like this:

0 5 */15 * * /home/asdfghjkl/check_links.sh "https://url"Code language: Bash (bash)

This will run the script at 5:00am twice a month. If you're unfamiliar with the format, check out crontab.guru for some examples – it's an incredibly useful piece of software to know and can accommodate the most complex schedules. It's best to include the full path to the script: cron should use your home directory as its working directory, but you never know.

To email our results, there's no need to reinvent the wheel: cron can do it too. In your crontab, set the MAILTO variable, and make sure it's above the line you added:

MAILTO="email@address.com"Code language: Bash (bash)

You just need to make sure your server can send emails. Now, I've run my own mailservers before, for fun mind you, and if you haven't, don't. It Is Hell. You spend an age getting postfix and a nice web interface set up perfectly, create your SPF records, generate your DKIM keys, check your IP on all the blacklists, and then everyone drops your mail in the spam box or rejects it outright anyway. Don't forget we're sending emails full of random links too, which never helps. No, email is one of those things I will happily pay (or trade for diet pill ads) to have dealt with for me. I use ssmtp, which quietly replaces the default mail/sendmail commands and only needs a simple config file filling with your SMTP details. That link has some tips on setting it up with a Gmail account; I use a separate address from an old free Google Apps plan so I'm not leaving important passwords floating about in cleartext.

The only problem with this approach is that cron is chatty. Okay, it's 45 years old and perfect as far as I'm concerned, but if a task outputs anything, it figures you want an email about it – even if it finished successfully and only printed to stdout. There are a few solutions to this: you can set the MAILTO variable more than once in your crontab, so you can set it just for this task and unset it afterwards:

MAILTO="email@address.com"
0 5 */15 * * /home/asdfghjkl/check_links.sh "https://url"
MAILTO=Code language: Bash (bash)

Or you could go scorched-earth and redirect everything else to /dev/null:

0 0 * * * important_thing > /dev/null 2>&1Code language: Bash (bash)

But if you still want other commands to email if something goes wrong, you want cronic. It's a small shell script to wrap commands in that suppresses output unless an error occurred, so that's the only time you'll get emails. If your distribution doesn't have a package for it, just drop it in /usr/local/bin and chmod +x it, then prepend your commands with cronic. You don't need it for our script, because we exit 0 without any output if we found nothing, but it works fine with or without.

(P.S. if you've done that and the deluge hasn't ceased, also check root's crontab with sudo crontab -e and anything in /etc/cron.d, hourly, daily etc)

Bonus tip: add an alias to your ~/.bashrc to let you check a URL from the command line:

alias check-links="/home/asdfghjkl/check_links.sh"Code language: Bash (bash)

Save and run bash to reload, then you can check-links https://url.horse to your heart's content.

Okay, that's it. This post turned out quite excessive for a simple script, so I'm sorry if it was a bit long. I find if I don't practice stuff like this regularly I start to forget the basics, which I'm sure everyone can relate to. But if I rubber duck it from first principles it's much easier to remember, and god knows my girlfriend has suffered enough, so into the void it goes. Have a good one.

Double bonus tip: since I'm still awake, here's a modified version of the script that ingests an XML sitemap instead of a single page to check. Many CMSs will generate these for you so it's an easy way to check links across your entire website without having to scrape it yourself. I made this for WordPress but it should work with any sitemap that meets the spec.

#!/bin/bash
# run as ./check_sitemap.sh https://example.com/wp-sitemap-posts-post-1.xml
# note: each wordpress sitemap contains max 2000 posts, scrape wp-sitemap.xml for the rest if you need. pages are in a separate sitemap.

# don't check URLs containing these patterns (supply a POSIX regex)
# these are some sane defaults to ignore for a wordpress install
ignore="xmlrpc.php|//fonts.googleapis.com/|//fonts.gstatic.com/|//secure.gravatar.com/|//akismet.com/|//wordpress.org/|//s.w.org/|//gmpg.org/"
# optionally also exclude internal links to the same directory as the sitemap
# e.g. https://example.com/blog/sitemap.xml excludes https://example.com/blog/foo but includes https://example.com/bar
ignore="${ignore}|$(echo $1 | grep --perl-regexp --only-matching '//.+(?:/)')"
# optionally exclude internal links to the sitemap's entire domain
#ignore="${ignore}|$(echo $1 | grep --extended-regexp --only-matching '//[^/]+')"

# check for arguments
if [[ $# -eq 0 ]]; then
	echo 'No URL supplied'
	exit 1
fi

# download sitemap.xml
sitemap_content=$(wget --execute robots=off --no-directories --no-verbose --timeout 10 --tries 1 --output-document - $1)
if [[ $? -eq 0 ]]; then
	echo 'Failed to get sitemap URL'
fi
# extract URLs from <loc> tags, scan for links, follow to see if they exist
wget_output=$(echo "$sitemap_content" | grep --perl-regexp --only-matching '(?<=<loc>)https?://[^<]+' | wget --input-file - --reject-regex $ignore --spider --recursive --execute robots=off --no-directories --no-verbose --span-hosts --level 1 --timeout 10 --tries 1 --wait 3 2>&1)
# if wget exited with error (i.e. if any broken links were found)
if [[ $? -ne 0 ]]; then
	echo -e "Found broken links in ${1}:\n"
	# check for broken link line, return one line before, remove broken link line, remove colon from end of url
	echo "$wget_output" | grep --before-context 1 --no-group-separator 'broken link!' | grep --invert-match 'broken link!' | sed --expression 's/:$//'
	# same again, but for failure to resolve
	echo "$wget_output" | grep 'unable to resolve' | sed --expression 's/^wget: //'
	# exit with error
	exit 1
fi

# otherwise, exit silently with success
exit 0
Code language: Bash (bash)

A short explanation of the changes: since wget can't extract links from xml files, we first download the sitemap to stdout (--output-file -) and search it for URLs. The ones we want are inside <loc> tags, so we grep for those: (?<=...) is a "positive lookbehind", which finds a tag located just before the rest of the match but doesn't include it in the result. We then match for http(s)://, then any number of characters until we reach a < symbol, signifying the start of the closing </loc>.

We pass our list of URLs to wget using --input-file - and scan each in turn for broken links as before. This time we add a 3-second wait between requests to avoid hitting anyone too fast, and also allow for ignoring certain URL patterns using --reject-regex. A CMS likely pulls in some external resources which we don't need to be warned about – for example, fonts.googleapis.com is linked here in the <head> to be DNS prefetched, but the URL itself will always 404. We don't need an email about it. I've prefilled the $ignore variable with some reasonable exclusions for a stock WordPress install: note the patterns don't need wildcards, so use //domain.com/ to ignore a whole domain and xmlrpc.php for a specific file.

Something else you might like to ignore is your own site! You already have all the links to scan so there's little need to go through them again on each page, though maybe you'd like to check for typos or missing resources. I'm only interested in external links, so I use the second $ignore addition (line 11) to exclude everything from the same subdirectory as the sitemap. The grep command here takes our input URL, starts at the // of https://, and matches any character up until the final / is found. This removes just the sitemap filename and leaves the rest behind. So feeding it https://asdfghjkl.me.uk/blog/sitemap.xml would give //asdfghjkl.me.uk/blog/ as the exclusion, ignoring /blog and /blog/post but still checking links to other parts of the site like /shop or /. To instead exclude my entire domain I could switch it with line 13, where the regex starts at // and stops when it finds the first / (if it exists), leaving //asdfghjkl.me.uk as the exclusion.

The only thing missing from this script variation is letting you know which specific page it found a broken link on – right now it just reports the sitemap URL. Instead of passing the list of URLs to wget in one go, you could loop through one at a time and output that for the "Found broken links" message. But that is left as an exercise to the reader. I'm out!

Building a loopable slider/carousel for my portfolio in vanilla JS and CSS

Stuck in lockdown in this most cursed year, I finally decided to throw together the portfolio website I've been putting off forever. I've been meaning to play with static site generators, but I've become fat and lazy on WordPress plugins and figured my core could use a workout. I wanted to be able to hand-write a snappy, responsive site in nothing more than HTML, CSS and a little JS – no frameworks and no external resources – that would still make sense when I wanted to add to it later.

I chose flexbox over the newer CSS Grid purely for the practice, so it took a little more work to have both rows and columns in my layout (it's broadly designed for one or the other). I wanted to split my work up into categories, then for each of those arrange a selection of items in rows. Instead of stacking rows, which would make my single page way too long, I decided to treat them as slides in a carousel and use navigation buttons to move left and right. With flexbox this is easy, since we can specify the order in which rows appear and use CSS transitions to animate nicely between them. A little JS handles the navigation, and we can support non-JS users by simply letting the rows stack as they normally would.

I won't go into too much detail on how I set up the overall layout – it's fairly simple and you're welcome to use my source for inspiration. I've tried to annotate it well enough that you can recreate it yourself, but feel free to leave a comment or email if you get stuck anywhere.

Let's create our first section and insert a container for our carousel rows:

<div class="section-container">
	<header>
		<h2>Section title</h2>
	</header>
	<div class="section-content carousel-outer">
		<nav class="carousel-buttons">
			<button class="carousel-left" aria-label="left">&lt;</button>
			<button class="carousel-right" aria-label="right">&gt;</button>
		</nav>
		<div class="section-intro">
			<p>Section introduction</p>
		</div>
		<div class="carousel">
			<div class="row">
				<div class="column">
					<picture>
						<source srcset="images/item-1.avif" type="image/avif">
						<img src="images/item-1.png" alt="Item 1 alt" loading="lazy">
					</picture>
				</div>
				<div class="column">
					<div class="item-description">
						<h3>Item 1 title</h3>
						<p>Item 1 description</p>
					</div>
				</div>
			</div>
			<div class="row">
				<div class="column">
					<picture>
						<source srcset="images/item-2.avif" type="image/avif">
						<img src="images/item-2.png" alt="Item 2 alt" loading="lazy">
					</picture>
				</div>
				<div class="column">
					<div class="item-description">
						<h3>Item 2 title</h3>
						<p>Item 2 description</p>
					</div>
				</div>
			</div>
		</div>
	</div>
</div>
Code language: HTML, XML (xml)

And style it (I haven't shown how I've styled the contents of each row, just to simplify things):

.section-container {
	overflow: hidden;
}

.row {
	flex: 0 0 100%;
}

.carousel {
	display: flex;
	flex-flow: row nowrap;
	transform: translateX(-100%);
}

.carousel-transition {
	transition: transform 0.7s ease-in-out;
}

.carousel-buttons {
	float: right;
	margin-top: -4rem;
	padding: 1rem;
}

.carousel-buttons button {
	height: 4rem;
	width: 4rem;
	font-size: 3rem;
	font-weight: 900;
}

.carousel-buttons button:nth-of-type(1) {
	margin-right: 1rem;
}
Code language: CSS (css)

We set overflow: hidden on section-container to hide the inactive slides to the left and right. The flex property on row sets it to 100% of the width of its container, without being allowed to grow or shrink. row nowrap on carousel will display the slides side-by-side, and by default we translate the carousel 100% (i.e. one slide) to the left, which I'll explain later. We add a few more styles to animate the carousel's movement (with a separate class, important for later), and place the navigation buttons above the container on the right hand side. Note that we don't style carousel-outer at all – this is purely used by our navigation JS later.

For non-javascript users, we want the slides to stack instead, so we set carousel to row wrap. We remove the translation, hide the navigation buttons and add padding to the bottom of every slide but the last. Handily, putting a <style> inside a <noscript> is now valid as of HTML5, so we can drop this after our linked styles in the <head> to only apply these changes to non-JS users:

<noscript>
	<style>
		/* show all slides if js is disabled */
		.section-content .carousel {
			flex-flow: row wrap;
			transform: translateX(0);
		}
		
		.carousel .row {
			padding-bottom: 4rem;
		}
		
		.carousel .row:nth-last-of-type(1) {
			padding-bottom: 0;
		}
		
		.carousel-buttons {
			display: none;
		}
	</style>
</noscript>
Code language: HTML, XML (xml)

All we need now is a little JS to move the slides when the buttons are clicked. We place this inline at the bottom of our HTML before the closing </body> tag, so it won't run until all the elements we need have loaded. I'll run through it section by section.

document.querySelectorAll(".carousel-outer").forEach(function(element) {
	let total_items = element.querySelectorAll(".row").length;
	element.querySelectorAll(".row").forEach(function(slide, index) {
		if (index + 1 == total_items) {
			slide.style.order = 1;
		} else {
			slide.style.order = index + 2;
		}
	});
	element.querySelector(".carousel-left").addEventListener("click", () => {
		prevSlide(element);
	});
	element.querySelector(".carousel-right").addEventListener("click", () => {
		nextSlide(element);
	});
	element.querySelector(".carousel").addEventListener("transitionend", (event) => {
		updateOrder(event, element);
	});
});
Code language: JavaScript (javascript)

Our first function runs when the page first loads, once for each carousel-outer (i.e. each carousel) on the page. It counts the number of slides (rows) then sets the CSS order property for each to determine the order they will appear on the page. We use JS for this so we don't have to manually update the CSS for every slide if we add or remove any later. Since index (the order slides appear in the HTML) starts at 0 and CSS order at 1, we work with index + 1.

If we've found the final slide, we make that the first in the order. If not, we add 1 (remember we already need to add 1 to index, so it's really 2). The reason we do this is so the user can navigate left to view the final slide, and having it already there in the first position means we can animate it in. So the first slide in the HTML will be in position 2, the second in position 3, etc etc, and the last in position 1. This is why we applied transform: translateX(-100%) to the carousel earlier: this moved every slide one position to the left, so our first slide (position 2) will be immediately visible, our second slide (position 3) off-screen to the right, and our last slide (position 1) off-screen to the left. Everything is now ready to be animated!

Before we do that, we add a few EventListeners to handle the buttons. The first listens for each left navigation button being clicked, calling prevSlide and passing on which carousel needs moving. The second does the same for the right button, calling nextSlide. The last listens for animations finishing on each carousel, calling updateOrder when we need to update the CSS order to reflect what's currently on display. Let's cover nextSlide and prevSlide first.

var prevSlide = function(element) {
	element.querySelector(".carousel").classList.add("carousel-transition");
	element.querySelector(".carousel").style.transform = "translateX(0)";
};
var nextSlide = function(element) {
	element.querySelector(".carousel").classList.add("carousel-transition");
	element.querySelector(".carousel").style.transform = "translateX(-200%)";
};
Code language: JavaScript (javascript)

These are both pretty simple. We're passed the carousel-outer containing the clicked button as element, so we look within that for an element with the carousel class, and add the carousel-transition class to it to enable the animation. More on that later. To move to the previous slide, we then translate the carousel on the x-axis to 0. Remember we're starting at -100%, so this moves everything to the right by one slide. To move to the next slide, we translate to -200%, a difference of -100%, so everything moves to the left by one slide.

Now for updateOrder:

var updateOrder = function(event, element) {
	if (event.propertyName == "transform") {
		let total_items = element.querySelectorAll(".row").length;
		if (element.querySelector(".carousel").style.transform == "translateX(-200%)") {
			element.querySelectorAll(".row").forEach(function(slide) {
				if (slide.style.order == 1) {
					slide.style.order = total_items;
				} else {
					slide.style.order--;
				}
			});
		} else {
			element.querySelectorAll(".row").forEach(function(slide) {
				if (slide.style.order == total_items) {
					slide.style.order = 1;
				} else {
					slide.style.order++;
				}
			});
		}
	}
	element.querySelector(".carousel").classList.remove("carousel-transition");
	element.querySelector(".carousel").style.transform = "translateX(-100%)";
};
Code language: JavaScript (javascript)

We want our carousel to be loopable: when you get to the final slide, you should be able to keep moving to get back to the first. So we can't just keep translating by -100% or 100% every time! Instead, once the animation is finished (hence why we run this on transitionend), we reset the CSS order so the slide on display is now in position 2, and, without animating again, instantly translate the carousel back to its original -100% to counteract this change. I'll admit this confused me a bit at the time, so let me take you through it step by step.

We passed through event to our function so we can check what animation type triggered it. The listener also picks up animations of child elements within carousel, and since I animate opacity changes for my click-to-play YouTube videos, we first need to exclude anything that isn't a transform.

As before, we count the number of row elements within the carousel, then look at the current state of the transform property to work out which direction we've just moved in. If it's -200%, we've moved left, otherwise we must have moved right. If we moved left, we reduce each slide's order by 1 to reflect its actual position. So the slide previously on display, which was in position 2, should now be in position 1; the new slide on display, which was in position 3, should now be in position 2; and so on. We want the final slide, (which was just off to the left) to loop around to the other end, so that gets the highest position. We do the opposite if we moved right: we increase each slide's order by 1, and if it was already the highest, we put that in position 1 so it's ready on the left for our next move.

Of course, what we've just done here is a repeat what we already did with the transform property. We already translated the carousel one position to the left or right, now we've done the same again with the CSS order – just without the nice animation. We don't want to move by two slides at a time, so now we reset the transform property back to its original -100%, ready for the next move. But first we disable animation by removing the carousel-transition class, making the switch invisible to the visitor. This also has the convenient side-effect of stopping transitionend from firing on our reset, which would otherwise call updateOrder again and make our carousel loop infinitely!

That's just about it! I can think of a couple of simple ways to extend this, like making the carousels draggable for easier mobile use, letting the keyboard arrows move whichever carousel is in view, and using an Intersection Observer to lazyload any images in the previous slide in line (right now only the next slide's images load before they enter the viewport). But that's all out of scope for my little website – maybe I'll get around to it in a couple of years 😉

You can see the finished carousel in action on my portfolio, and thanks to Useful Angle for giving me the inspiration to use CSS order to make it loop!

Creating click-to-play YouTube videos in JS and CSS that don’t load anything until they’re needed

Let's be honest: streaming video is kinda hard. If you want to embed a video on your website, you're going to need it in multiple formats to support all the major browsers, and you'll probably want each of those in multiple resolutions too so your visitors with slower connections or less powerful devices aren't left out in the cold.

You can always roll your own native HTML5 player with a bit of messing about in ffmpeg and a DASH manifest, or go ready-made and embed JWPlayer or Video.js. Of course, since video can be pretty heavy, you might want to host the files from a CDN too.

But I just want a simple little website for my personal portfolio, and since I don't expect many visitors, it's just not worth the effort. I'm not the biggest Google fan but it's undeniable that YouTube have built a very competent platform, and it's very tempting to just throw a couple iframes up and call it a day. But my website is lightweight and fast (and I feel smug about it): it doesn't need to pull in any external resources, and I don't want Google tracking all of my visitors before they've even watched a video. With a few simple changes, we can make our embeds only load when they're clicked, and give them nice thumbnails and buttons to boot.

We start by creating our placeholder player:

<div class="youtube overlay" data-id="xi7U1afxMQY">
	<a class="play" href="https://youtube.com/watch?v=xi7U1afxMQY" aria-label="Play video">
		<div class="thumbnail-container">
			<picture>
				<source srcset="thumbnails/mountains.avif 960w, thumbnails/mountains-2x.avif 1920w" type="image/avif">
				<img class="thumbnail" srcset="thumbnails/mountains.jpg 960w, thumbnails/mountains-2x.jpg 1920w" src="thumbnails/mountains.jpg" alt="Life in the Mountains" loading="lazy">
			</picture>
			<span class="duration">8:48</span>
			<div class="play-overlay"></div>
		</div>
	</a>
</div>
Code language: HTML, XML (xml)

The ID of the video is stored in the data-id attribute, which we'll use later to insert the iframe. Since we'll need Javascript for this, the play link contains the full URL so non-JS users can click through to watch it directly on YouTube. We include a thumbnail, in JPG for compatibility and AVIF for better compression on modern browsers (avif.io is a great little online tool to convert all of your images, since as I write this it's rarely supported by image editors), and in two resolutions (960px and 1920px) as smaller screens don't need the full-size image. We also include the duration – why not? – and play-overlay will hold a play button icon.

We can now apply some CSS:

.overlay {
	position: relative;
	width: 100vw;
	height: calc((100vw/16)*9);
	max-width: 1920px;
	max-height: 1080px;
}

.overlay .thumbnail-container {
	position: relative;
}

.overlay .thumbnail {
	display: block;
}

.overlay .duration {
	position: absolute;
	z-index: 2;
	right: 0.5rem;
	bottom: 0.5rem;
	padding: 0.2rem 0.4rem;
	background-color: rgba(0, 0, 0, 0.6);
	color: white;
}

.overlay .play-overlay {
	position: absolute;
	z-index: 1;
	top: 0;
	width: 100%;
	height: 100%;
	background: rgba(0, 0, 0, 0.1) url("images/arrow.svg") no-repeat scroll center center / 3rem 3rem;
	transition: background-color 0.7s;
}

.overlay .play-overlay:hover {
	background-color: rgba(0, 0, 0, 0);
}

.overlay iframe {
	position: absolute;
	z-index: 3;
	width: 100%;
	height: 100%;
}
Code language: CSS (css)

On my site I've already set the width and height for the video's container, so I've just shown an example for overlay here, using vw units so it fills the viewport's width whether portrait or landscape. My thumbnails only go up to 1920x1080 so I've limited it to that in this example. Sorry 4K users! You can use a calc expression for the height to get the correct aspect ratio (here 16:9).

On to positioning. Setting position: relative for the container means we can use absolute positioning for the iframe to fit to the thumbnail's size, and position: relative on the thumbnail's container and display: block on the thumbnail itself fits everything else to the thumbnail too. Duration sits in the bottom right with a little space to breathe. We set z-indexes so elements will stack in the correct order: thumbnail on the bottom, overlay above it, duration on top of that, and the iframe will cover everything once it's added.

What remains is just little extras: the overlay slightly darkens the thumbnail until it's hovered over, and we take advantage of the background property allowing both colour and URL to drop a play button on top. The button is an SVG so simple you can paste the code into arrow.svg yourself:

<svg xmlns="http://www.w3.org/2000/svg" viewBox="0 0 100 100"><polygon points="0 0 100 50 0 100 0 0" style="fill:#fff"/></svg>Code language: HTML, XML (xml)

Now all we need is a little JS to handle inserting the iframe when the placeholder is clicked – no JQuery required! Insert it just before the closing </body> tag so it runs once all the placeholders it'll be working on have loaded.

document.querySelectorAll(".youtube").forEach(function(element) {
	element.querySelector(".play").addEventListener("click", (event) => {
		event.preventDefault();
		loadVideo(element);
	});
});
var loadVideo = function(element) {
	var iframe = document.createElement("iframe");
	iframe.setAttribute("src", "https://www.youtube.com/embed/" + element.getAttribute("data-id") + "?autoplay=1");
	iframe.setAttribute("frameborder", "0");
	iframe.setAttribute("allowfullscreen", "1");
	iframe.setAttribute("allow", "accelerometer; autoplay; clipboard-write; encrypted-media; gyroscope; picture-in-picture");
	element.insertBefore(iframe, element.querySelector(".play"));
};
Code language: JavaScript (javascript)

The first function finds every placeholder on the page, adding a listener for each play button being clicked. Note that we use the overlay class for the CSS but youtube for the JS – this is so we can extend our code later to cover more platforms if we like, which would need different JS. When a visitor clicks play, it cancels the default action (navigating to the URL, which we included for non-JS users) and calls the loadVideo function, passing on the specific video they clicked.

The loadVideo function puts together the iframe for the video embed, getting the ID from the container's data-id attribute. We use www.youtube-nocookie.com (the www is necessary!) as it pinkie promises not to set cookies until you play the video (2022 edit - this URL seems to be commonly blocked by adblockers, so I've reverted it to the standard one), and set a few attributes to let mobile users rotate the screen, copy the link to their clipboard etc. Although we set it to autoplay since we've already clicked on the placeholder, it doesn't seem to work as I write this. I'm not sure why and they encourage you to embed their JS API instead, but that would sort of defeat the point. Finally, it inserts the iframe as the first element in the container, where it covers up the rest.

If all goes well, you should now have something that looks like this (albeit functional):

Completed placeholder for click-to-play video

You can also see it in action on my website. Thanks for reading!

Quick fix: Lenovo Thinkpad X240 won’t POST, one long/continuous beep then reboots and repeats forever

tl;dr: disconnect the keyboard, you have stuck keys

Hello! The year is 2020 and this blog still exists. With the explosion of stackexchange, reddit and thousands of scam sites that force you to add "stackexchange" or "reddit" to your search terms to get any useful results, it's become increasingly easy to find the solution to almost anything. I've barely found anything tough enough to solve that it's been worth putting up here to save the next person the bother.

Here's one, though. I've still got my 2012 Thinkpad T430, bought used in 2015, dragged around on my back for tens of thousands of miles, and modded and upgraded almost to the point of insanity (if you haven't come across this incredible guide you're about to have the time of your life). Just popped in a new old CPU (i7-3840QM, happily overclocks to 4.2GHz on a cool day) which should give it another 5 or so years, 1080p conversion kit on the way (it's cheaper on Taobao! Leave a comment or email if you've never ordered and need a hand) and eagerly awaiting my ExpressCard to NVMe adapter so I can give it its fourth drive for literally no other reason than that's a hilarious stupid number so why would I not.

Anyway, with a 67% successful resuscitation rate after full-on filthy river drownings I'm convinced the things are bulletproof, force them on my friends and colleagues wherever I can (interest you in a used buyer's guide guv?) and happily fix problems in exchange for beer. Living in Cambodia during COVID I've been blessed to stumble upon SPVT Supply, who can source seemingly anything from brand new original parts to obscure Chinese copies at your preferred quality, whilst completely ignoring the reality that it's meant to take 6 weeks or so to get anything posted here. Magical. Tell em Michael sent you.

So I ended up with a well-loved X240 in my hands, featuring a completely non-functional keyboard and exhibiting screen tearing and complete lockups when slightly flexed. Easy fix for the latter: Jägermeister goes in your mouth, not in the RAM slot.

For future reference, it's also not suggested for the CPU cooler, battery, case or VGA port.

After a solid cleanup with soap & water, unlabelled mystery pharmacy alcohol and a sack of ancient silica gel packets that I occasionally dry out in an oven/frying pan/open fire/weak ray of sunshine, it happily booted a couple of times. Keyboard was still dead, there was visible corrosion inside and being plastic-welded together there was little point in disassembly. I grabbed the schematic and boardview and since the keyboard doesn't have a controller built in, traced the signal lines back through the motherboard and gave the relevant areas a more thorough clean. No dice but no worries, they're cheap enough to replace.

After a couple more boots, the laptop started refusing to POST at all. Power light on, fan spinning, but nothing on the display and it would emit a continuous beep for 5 seconds or so before power-cycling and repeating forever. This isn't in Lenovo's list of beep codes (I'd link it but it 404s right now) and all I could find from the docs for similar BIOSes was "replace system board". Dropping $100 on a new motherboard for a 2-beer repair wasn't in my plan, so I poked around some more and, to cut to the chase:

Disconnect the keyboard ribbon cable from the motherboard.

My vigorous gentle scrubbing had switched the keyboard from "no keys work" to "keys work too much", effectively holding down a bunch of keys all the time. Do that during startup and it won't POST or even turn on the display. Disconnect the internal keyboard, tip your local computer shop a few cents to borrow a USB keyboard for 30 seconds to bypass the date/time error since the CMOS battery's been disconnected (it'll get it from the OS anyway once it boots the first time) and you're golden.

If it's 3am and this situation sounds eerily familiar to you, I hope this helped!

Download YouTube videos quickly in countries with slow international links

My local ISP recently installed fibre in town, which freed us up from the horror that is 700kbit WiMAX connections. The sales rep came round and enthusiastically encouraged us to upgrade to an "up to 100mbit" plan, which turned out to be shared with the entire town.

Yep.

So in practice we get about 1mbit for international traffic, though national traffic is pretty fast at 8-25mbit. Google and Akamai have servers in Madagascar so Google services are super fast, Facebook works great and Windows updates come through fairly quickly, but everything else sorta plods along.

Spotify, Netflix and basically anything streaming are out, but YouTube works perfectly, even in HD, as long as you immediately refresh the page after the video first starts playing. It seems that the first time someone loads a video, it immediately gets cached in-country over what I can only assume is a super-secret super-fast Google link. The second time, it loads much quicker.

This is great in the office, but if you want to load up some videos to take home (internet is way too expensive to have at home) you're going to want to download them. I'm a big fan of youtube-dl, which runs on most OSs and lets you pick and choose your formats. You can start it going, immediately cancel and restart to download at full speed, but you have to do it separately for video and audio and it's generally pretty irritating. So here's a bit of bash script to do it for you!

First install youtube-dl and expect if you don't have them already:

sudo apt-get install youtube-dl expect

Then add something like this to your ~/.bashrc:

yt()
{
expect -c 'spawn youtube-dl -f "bestvideo\[height<=480\]/best\[height<=480\]" -o /home/user/YouTube/%(title)s.f%(format_id)s.%(ext)s --no-playlist --no-mtime '"$1"'; expect " ETA " { close }'
expect -c 'spawn youtube-dl -f "worstaudio" -o /home/user/YouTube/%(title)s.f%(format_id)s.%(ext)s --no-playlist --no-mtime '"$1"'; expect " ETA " { close }'
youtube-dl -f "bestvideo[height<=480]+worstaudio/best[height<=480]" -o "/home/user/YouTube/%(title)s.%(ext)s" --no-playlist --no-mtime $1
}

Run bash to reload and use it like yt https://youtube.com/watch?v=whatever

The first two expect commands start downloading the video and audio respectively (I limit mine to 480p or below video and the smallest possible audio, but feel free to change it), killing youtube-dl as soon as they see " ETA " which appears once downloads start. The third command downloads the whole thing once it's been cached in-country.

The reason we include the format ID in the filename for the first two commands is because when downloading video and audio together, youtube-dl adds the format code to the temporary files as title.fcode.ext. When downloading just video or just audio, these aren't included by default. By adding these ourselves, the third command will resume downloading from the existing files and remove them automatically after combining them into one file.

I like to include --no-mtime so the downloaded files' modification date is when they were downloaded, rather than when the video was uploaded. This means I can easily delete them after a month with a crontab entry:

0 21 * * Sun root find /home/user/YouTube/ -type f -mtime +31 -print -delete

Ignore the running as root bit, it's on a NAS so everything runs as root. Woo.

Bash one-liner: Add an Apache directory index to an aria2 download queue

I work in a country with terrible internet, so large downloads through browsers often break part way through. The solution is aria2, a command-line download utility with an optional web UI to queue up downloads. This runs on a server (i.e. a laptop on a shelf) with a few extra config options to make it handle dodgy electricity and dodgy connections a bit better.

A simple crontab entry starts it on boot:

@reboot screen -dmS aria2 aria2c --conf-path=/home/user/.aria2/aria2.conf

The config file /home/user/.aria2/aria2.conf adds some default options:

continue
dir=/home/user/downloads
enable-rpc
rpc-listen-all
rpc-secret=secret_token
check-certificate=false
enable-http-pipelining=true
max-tries=0
retry-wait=10
file-allocation=none
save-session=/home/user/.aria2/aria2.session
input-file=/home/user/.aria2/aria2.session
max-concurrent-downloads=1
always-resume=false

The three RPC options allows the web UI to connect (port 6800 by default), and the session file allows the download queue to persist across reboots (again, dodgy electricity).

Most downloads work fine, but others expire after a certain time, don't allow resuming or only allow a single HTTP request. For these I use a server on a fast connection that acts as a middleman - I can download files immediately there and bring them in later on the slow connection. This is easy enough for single files with directory indexes set up in Apache - right click, copy URL, paste into web UI, download. For entire folders it's a bit more effort to copy every URL, so here's a quick and dirty one-liner you can add to your .bashrc that will accept a URL to an Apache directory index and add every file listed to the aria2 queue.

dl()
{
wget --spider -r --no-parent --level=1 --reject index.html* -nd -e robots=off --reject-regex '(.*)\?(.*)' --user=apache_user --password=apache_password $1 2>&1 | grep '^--' | awk '{ print $3 }' | sed "s/'/%27/" | sed -e '1,2d' | sed '$!N; /^\(.*\)\n\1$/!P; D' | sed 's#^#http://aria2_url:6800/jsonrpc -H "Content-Type: application/json" -H "Accept: application/json" --data \x27{"jsonrpc": "2.0","id":1,"method": "aria2.addUri", "params":["token:secret_token", ["#' | sed 's#$#"], {"pause":"true", "http-user":"apache_user", "http-passwd":"apache_password"}]}\x27#' | xargs -L 1 curl
}

Add the above to your .bashrc and run bash to reload. Then, to add a directory:

dl https://website.com/directory/

By default this will add downloads paused - see below for more info.

The code is a bit of a mouthful, so here's what each bit does:

wget --spider -r --no-parent --level=1 --reject index.html* -nd -e robots=off --reject-regex '(.*)\?(.*)' --user=apache_user --password=apache_password $1 2>&1

--spider: Don't download anything, just check the page is there (this is later used to provide a list of links to download)
-r --no-parent --level=1: Retrieve recursively, so check all the links on the page, but don't download the parent directory and don't go any deeper than the current directory
--reject index.html*: Ignore the current page
-nd: Don't create a directory structure for downloaded files. wget needs to download at least the index page to check for links, but by default will create a directory structure like website.com/folder/file in the current folder. The --spider option deletes these files after they're created, but doesn't delete directories, leaving you with a bunch of useless empty folders. In theory you could instead output to a single temporary file with -O tmpfile, but for some reason this stops wget from parsing for further links.
-e robots=off: Ignore robots.txt in case it exists
--reject-regex '(.*)\?(.*)': ignore any link with a query string - this covers the ones which sort the listing by name, date, size or description
--user=apache_user --password=apache_password: if you're using Basic Authentication to secure the directory listing
$1: feeds in the URL from the shell
2>&1: wget writes to stderr by default, so we redirect all output to stdout

grep '^--' | awk '{ print $3 }' | sed "s/'/% 27/" | sed -e '1,2d' | sed '$!N; /^\(.*\)\n\1$/!P; D'

grep '^--': lines containing URLs begin with the date enclosed in two hyphens (e.g. --2017-08-23 12:37:28--), so we match only lines which begin with two hyphens
awk '{ print $3 }': separates each line into columns separated by spaces, and outputs only the third one (e.g. --2017-08-23 12:37:28-- https://website.com/file)
sed "s/'/%27/": Apache doesn't urlencode single quote marks in URLs but the script struggles with them, so we convert them to their URL encoded equivalent
sed -e '1,2d': the first two URLs wget outputs is always the directory itself, so we remove the first two lines
sed '$!N; /^\(.*\)\n\1$/!P; D': occasionally you get consecutive duplicate lines coming out, so this removes them. You could use uniq. But this looks more impressive.

sed 's#^#http://aria2_url:6800/jsonrpc -H "Content-Type: application/json" -H "Accept: application/json" --data \x27{"jsonrpc": "2 .0","id":1,"method": "aria2.addUri", "params":["token:secret_token", ["#'

Now it all gets a bit rough. We're now creating an expression to feed to curl that will add each download to the start of the queue. We want to run something like this for each line:

curl http://aria2_url:6800/jsonrpc -H "Content-Type: application/json" -H "Accept: application/json" --data '{"jsonrpc": "2 .0","id":1,"method": "aria2.addUri", "params":["token:secret_token", ["http://website.com/file"], {"pause":"true", "http-user":"apache_user", "http-passwd":"apache_password"}]}'

So we use sed once to add the bits before the URL (s#^#whatever# replaces the start of the line). We use # in place of the normal / so it works okay with all the slashes in the URLs, and replace two of the single quotes with their ASCII equivalent \x27 because getting quotes to nest properly is hard and I don't like doing it.

sed 's#$#"], {"pause":"true", "http-user":"apache_user", "http-passwd":"apache_password"}]}\x27#'

We then use sed again to add the bits after the URL (s#$#whatever# replaces the end of the line).

xargs -L 1 curl

Once everything's put together, we feed each line to curl with xargs. A successful addition to the queue looks like this:

{"id":1,"jsonrpc":"2.0","result":"721db74ea91db42c"}

Why are downloads added paused?

Due to the limited bandwidth of our office connection, we only run big downloads outside of office hours and restrict speeds to avoid hitting our monthly cap. You can change "pause":"true" to "pause":"false" if you prefer.

To automatically start and stop downloads at certain times, you can add crontab entries to the server you host aria2 on:

# Pause aria2 downloads at 8am and 2pm, but remove the speed limit
0 8,14 * * 1-5 curl http://127.0.0.1:6800/jsonrpc -H "Content-Type: application/json" -H "Accept: application/json" --data '{"jsonrpc": "2.0","id":1, "method": "aria2.pauseAll", "params":["token:secret_token"]}'
0 8,14 * * 1-5 curl http://127.0.0.1:6800/jsonrpc -H "Content-Type: application/json" -H "Accept: application/json" --data '{"jsonrpc": "2.0","id":1, "method": "aria2.changeGlobalOption", "params":["token:secret_token",{"max-overall-download-limit":"0"}]}'

# Resume downloads at 12pm and 5pm but limit speed to 80KB/s
0 12,17 * * 1-5 curl http://127.0.0.1:6800/jsonrpc -H "Content-Type: application/json" -H "Accept: application/json" --data '{"jsonrpc": "2.0","id":1, "method": "aria2.unpauseAll", "params":["token:secret_token"]}'
0 12,17 * * 1-5 curl http://127.0.0.1:6800/jsonrpc -H "Content-Type: application/json" -H "Accept: application/json" --data '{"jsonrpc": "2.0","id":1, "method": "aria2.changeGlobalOption", "params":["token:secret_token",{"max-overall-download-limit":"80K"}]}'

Caveats

  • wget --spider will download text files and those which are missing a ContentType header to check for further links. Apache will serve a header for most common types but does miss a few, and the DefaultType option has been deprecated so you can't set, say, application/octet-stream for anything unknown. It's therefore sensible to run this script on the server hosting the directory indexes so you're not waiting on downloads (which are albeit immediately deleted afterwards).

Laptop mysteriously turns on overnight: Logitech to blame

Something's been puzzling me for the past few weeks. At the end of each day I hibernate my laptop, stick it in my bag, and take it home. When I turn it on the next day, it tells me it powered off because the battery reached a critical level, and the battery has dropped to 3% (the shutdown threshold) from its original 100%. What gives?

I couldn't figure out whether the battery was draining itself overnight, or whether the computer was turning itself back on somehow. Luckily I have the terrible habit of falling asleep on the sofa (well, piece-of-sponge-with-some-slats) so at 3 o'clock one morning I caught it turning itself on.

Weeeeird.

Auto power-on wasn't configured in the BIOS and there was nothing plugged into the LAN port to wake it up. What had changed in the past few weeks?

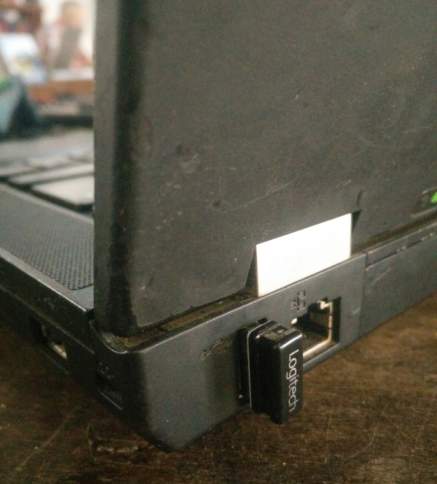
Logitech Unifying Receiver

I should really clean that screen hinge.

I have a Logitech Unifying Receiver for my wireless mouse, and I had recently made the apparently highly important decision that it was probably safer to leave it plugged in all the time rather than pull it out every day so it didn't get bashed up in my bag (turns out they pull apart quite easily, and I'm 6,000 miles from a replacement). Was this the culprit?

Windows includes a handy utility to find out what devices are configured to wake a computer, powercfg. You can run powercfg /devicequery wake_armed in a command prompt:

C:\Users\Michael>powercfg /devicequery wake_armed
HID Keyboard Device (001)
Intel(R) 82579LM Gigabit Network Connection
HID-compliant mouse (002)
Logitech HID-compliant Unifying Mouse

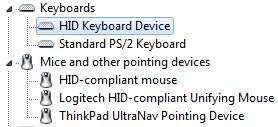
You can also run powercfg /lastwake to find out what device last woke the computer, but since I didn't run it until the subsequent startup, this wasn't very useful. So, keyboard, mouse and the ethernet connection. The ethernet connection is out, since there's nothing plugged into it. If we go to Device Manager, the HID devices are listed under Keyboards and Mice:

Keyboards and Mice in Device Manager

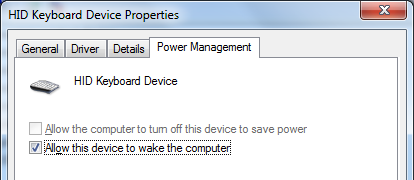
Double-clicking on each one of them in turn (apart from the built-in keyboard, listed as Standard PS/2 Keyboard; and trackpad, listed as ThinkPad UltraNav Pointing Device (what a name!)) and going to the Power Management tab showed that each of them were configured to wake the computer. I don't have a keyboard connected to the receiver, but I unchecked them all just to be sure. If you're not sure which devices correspond to the Logitech receiver, go to Details and select the Hardware Ids property. My receiver shows a VID of 046D and a PID of C52B, but if yours are different you can google them to find out what manufacturer and model they correspond to.

Allow this device to wake the computer

Rerunning the powercfg command above now shows that only the ethernet adapter can wake up the computer:

C:\Users\Michael>powercfg /devicequery wake_armed
Intel(R) 82579LM Gigabit Network Connection

Problem solved!