Category Archives: Internet

Run your Webasto from the internet with Victron’s Venus OS and Node-RED

Want to do this yourself? Grab everything you need from my Github!

If you live on a narrowboat, you'll definitely be used to being quite cold in the winter. There's not much worse than coming home late at night and knowing you're either going to have to spend an hour lighting the stove or go to bed wearing six layers!

Luckily, the previous owners of our boat were merciful and installed a Webasto diesel heater with radiators. We put a multi-fuel stove in anyway as a) it's very cosy and b) I don't trust it not to die in the middle of winter, but having the option of just clicking a button for heat saves a lot of admin. The only problem is, you need to be physically there to turn it on, which doesn't help you when you're on your way home and your house loses heat like a metal tube sitting in water. If you're in a house, you can of course just install a Nest or Hive or whatever. But everything is harder with 12 volts!

Last year I tore out the elderly electrics and batteries and installed the solar system of my dreams. Victron make a lot of fancy kit, but what I was most looking forward to was getting it all on the internet so I could stare at the battery voltage all day like the sad man I am. They make a range of GX devices to achieve this, but they go for hundreds. The good news is you can instead install their Venus OS on a Raspberry Pi, the bad news is the component shortage meant I had to wait an entire year to get hold of one.

Once I had everything hooked up, touchscreen and internet connection and all, the next step was to connect it to the heating. The most basic setup would be to use the built-in relay output and turn it on and off using the VRM control panel, but I wanted it a bit smarter so I didn't forget to turn it off (and ruin my batteries) or run it when the batteries are low (and ruin my batteries). Enter Node-RED, a simple but powerful way to virtually wire together devices and make lovely dashboards. It's included with the Venus OS large image and interacts with Victron kit out of the box so all I needed to do was put it together!

5V relay module
Installing the 5V relay module

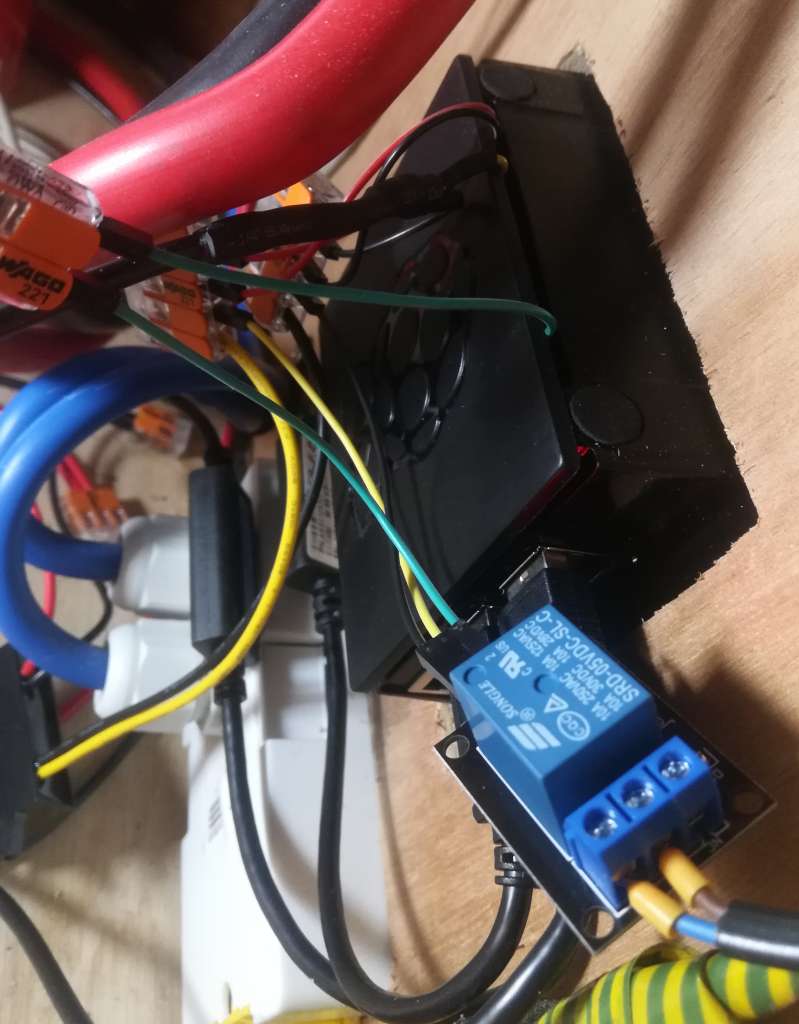
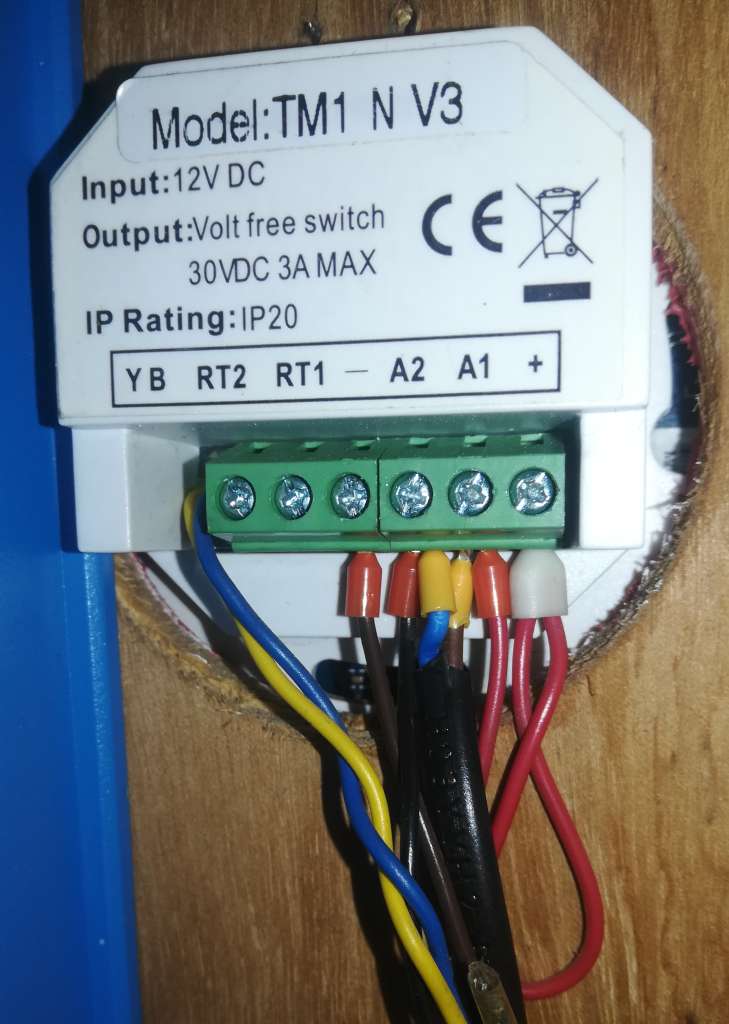
Connecting to the heater was simple enough. I grabbed a cheap 5V relay module off eBay, and hooked it up to 5V power and GPIO21 (pin 40) on the Pi. The stock Webasto timer uses its own relay to connect the A1 and A2 pins together, supplying 12V to the black wire on the wiring loom which turns on the heater. I duplicated this, connecting the NO and COM pins on the relay module to A1 and A2 so I could still use the existing timer if needed.

Timer connections
Connecting to the stock timer (yellow-ferruled wires connect to NO and COM on the relay module)

I also installed a DS18B20 temperature sensor to keep an eye on the bedroom temperature. This integrates with the Pi and Victron's VRM using SetupHelper and VenusOS-TemperatureService: just connect it to 5V power (not forgetting to wire a 4.7K resistor between the + and signal pins) and GPIO 4 (pin 7) on the Pi.

Node-RED flows

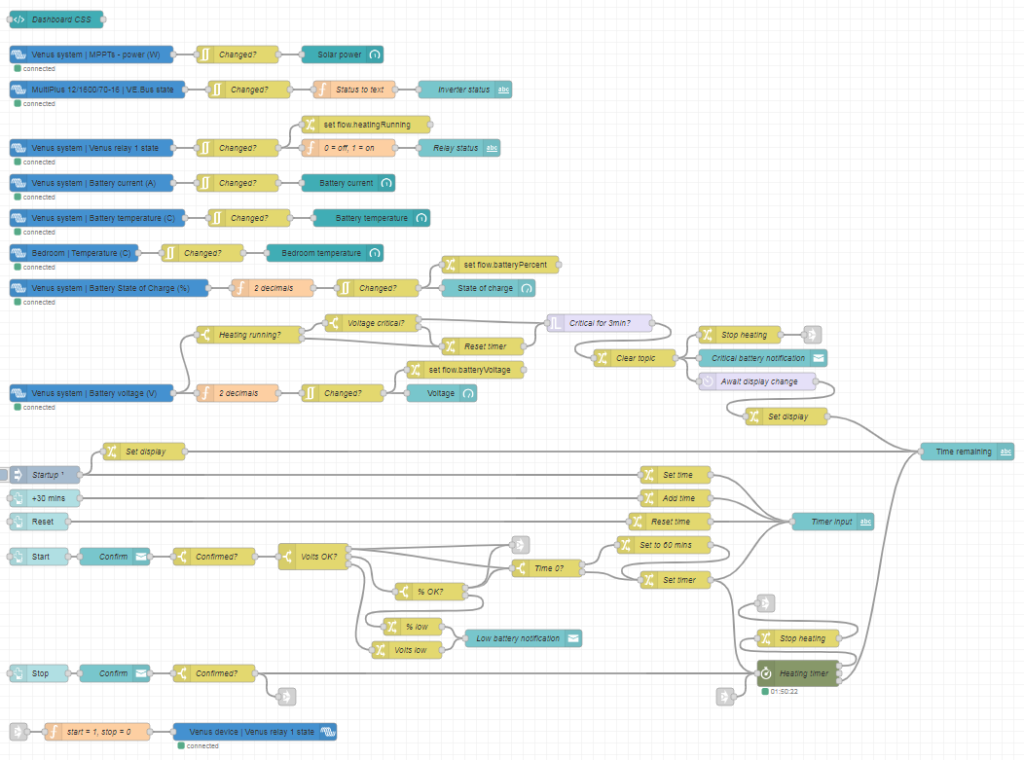
Next up was the Node-RED flows. I overcomplicated this a bit for extra features and a nice dashboard, so I'll go through it bit by bit. If you want your own, you can grab the file and install instructions from my Github.

The built-in Victron nodes let you query and control all of your connected devices. I have a SmartShunt battery monitor and SmartSolar MPPT controller, both connected to the Pi by VE.direct to USB cables, and a Multiplus inverter, connected with a VE.bus to USB cable.

Victron nodes

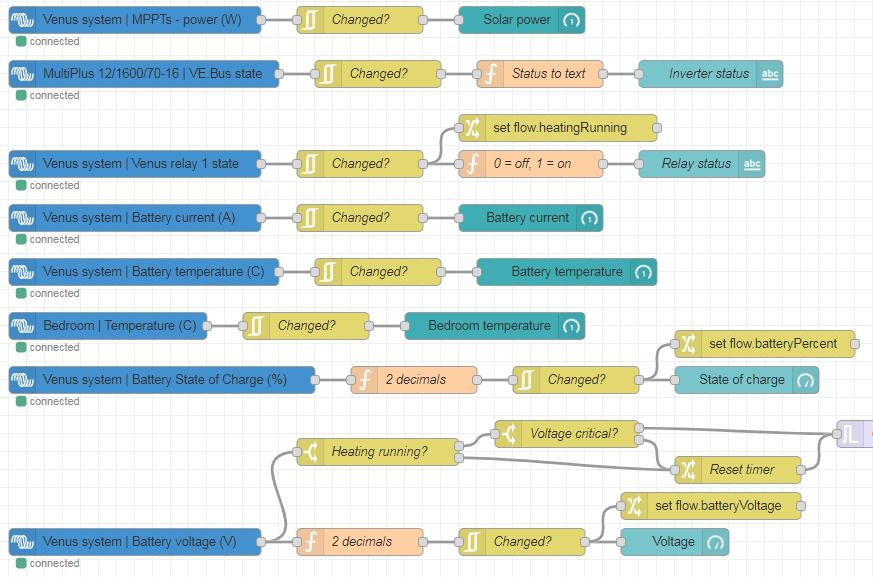
The Victron nodes (blue) feed into dashboard nodes (teal). They push data every 5 seconds, or immediately on change, so first I filtered them to only update if they've changed. I also applied a couple of functions to convert numerical status to text, or reduce the number of decimal places. The relay status, state of charge and battery voltage nodes also set flow-context variables that are used elsewhere.

Heating control nodes

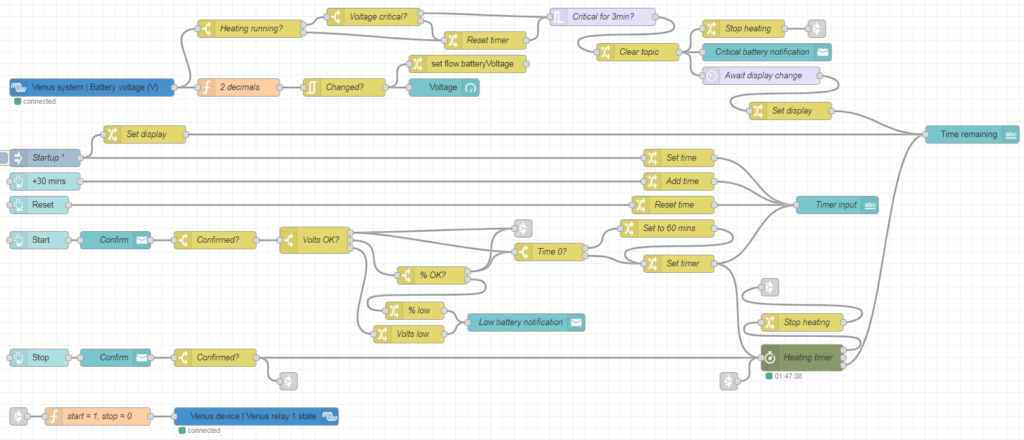
Next we have the heating controls. These are based around a timer node from node-red-contrib-stoptimer-varidelay. The +30 mins and Reset buttons edit a timer display, which is stored in another flow-context variable and pushed to the timer itself with the Start button. This also activates the heater relay. When the timer runs out, the relay is turned off again. The Stop button disables the heater relay and cancels the timer immediately. The Start and Stop buttons include a confirmation dialog to avoid inadvertently pressing them.

I also wanted to include some battery monitoring. The Webasto has its own low-voltage cutout, but this is set to something like 10.6V at which point your batteries are probably already wrecked. It's important to shut it down properly so it can clear the combustion chamber and cool down, so the safest way is to turn off the signal relay and let it finish up. When Start is pressed, I first check the battery voltage from the flow-context variable. If it's above 12.9V, the battery must be charging so we can skip the charge % check and start immediately. If it's between 12.1V and 12.9V, we move on to check the charge % (I like to check both as they get out of sync in winter when it's not fully charging every day). If it's over 55% (since you don't want to discharge lead-acid below 50%), we're okay to run. If the battery voltage is under 12.1V or charge % is under 55%, we pop up a notification and don't turn the heater on.

Battery checks while running

I also wanted to check the battery voltage while running: it's all well and good checking it at startup, but what if it gets dangerously low a few hours later? If the battery voltage drops below 11.85V while running and maintains that for 3 minutes, the heater will turn off.

I implemented this in the battery voltage flow. Each time the voltage updates, it will check if the heating is running. If so, it will check if the voltage has dropped under the critical level, and if so, will start a 3-minute timer. If the voltage rises again during this time, it will send a message to reset (i.e. cancel) the timer. This is important as the inverter or water pump starting up can cause the voltage to briefly drop under the critical level – but this doesn't mean the battery is empty!

I also included a connection from "Heating running? -> No" to the timer reset to avoid a race condition when the heating switches off. The "Heating running" switch checks the relay status, which doesn't update quite instantly when it changes. It was therefore possible that the 3-minute timer could start again, when the heater had already switched off but the relay status hadn't updated yet, thus sending another switch-off signal and notification 3 minutes later. The extra connection cancels the timer once the relay status has updated.

The final step was to put everything together into a nice dashboard. This uses the node-red-dashboard package, and node-red-contrib-ui-artless-gauge for some nice skinny gauges. I also added a tiny bit of CSS in a template node to make the confirmation dialogs look a bit nicer:

<style>
    .confirm-dialog .md-title {
        display: none;
    }
    .confirm-dialog .md-dialog-content-body {
        padding: 1em;
    }
</style>Code language: CSS (css)

And this is the final product!

Node-RED dashboard

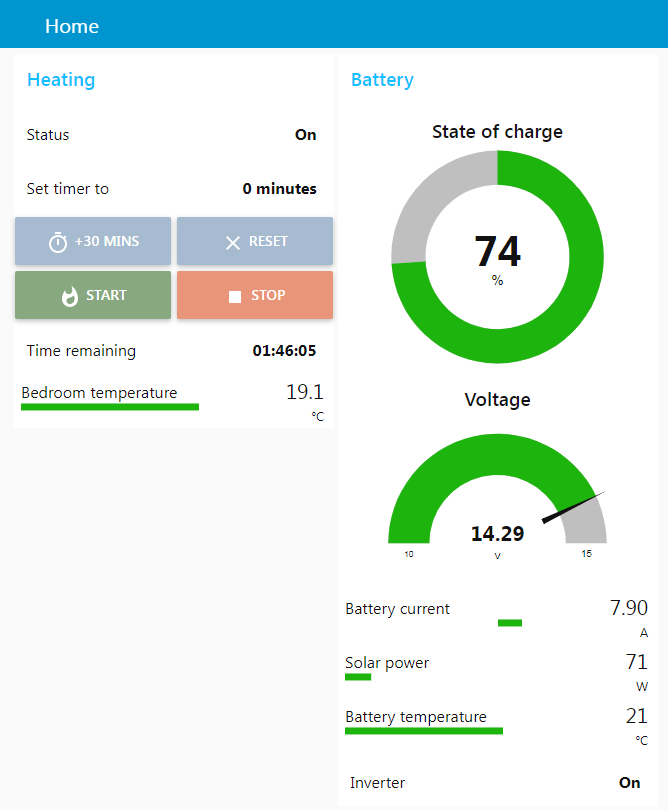
The dashboard is accessible locally at https://venus.lan:1881/ui, or online via the Victron VRM (choose Venus OS Large from the left hand menu, then Node-RED Dashboard). So now all I need to do is flick the heating on an hour or so before I get home, and arrive to a toasty boat!

If you've done something similar, I'd love to see it! Drop a comment below 🙂

Archiving everything I like with youtube-dl

Continuing on the theme of "link rot bad, hard drives cheap", a year or so ago I started archiving videos I'd liked or saved to YouTube playlists. You can do this manually without too much trouble but I chucked it in a shell script to run regularly, keeping as much metadata as possible. Here it is!

#!/bin/bash

# Archive youtube videos from a list of channels/playlists, in up to selected quality,
# with formatted filenames and all available metadata in sidecar files.
#
# Note: this probably relies on having an up-to-date youtube-dl, so we run
# youtube-dl -U in the root crontab an hour before this script runs

# Settings
quality='bestvideo[height<=?1080]+bestaudio/best[height<=?1080]'
# If we ever get infinite hard drive space:
#quality='bestvideo+bestaudio/best'
# Batch file of URLs to download
batch_file='youtube-list.txt'
# File to pull youtube cookies from (for private videos and liked playlist)
cookies_file='youtube-cookies.txt'
# Don't download anything absurdly-sized at all (if prefer to download but in worse quality,
# add to quality definition instead like [height<=?1080][filesize<10G]
max_filesize='10G'
# Clone current useragent (that account is logged in as)
user_agent='Mozilla/5.0 (Windows NT 6.1; Win64; x64) AppleWebKit/537.36 (KHTML, like Gecko) Chrome/83.0.4103.116 Safari/537.36'
# Bind to different IP in case of geo-blocks
# Country 1
source_IP='111.111.111.111'
# Country 2
#source_IP='222.222.222.222'
# ipv6 1 (etc)
#source_IP='2000:aaaa:b:cccc::'
# Limit download rate and sleep a random number of seconds between downloads to avoid IP blocks
rate_limit='5M'
sleep_min='10'
sleep_max='15'
# Set folder and filename format, and an archive file to avoid redownloading completed videos
filename_format='youtube/%(playlist)s/%(playlist_index)05d - %(title)s - %(id)s - %(upload_date)s.%(ext)s'
archive_file='youtube/youtube-dl-downloaded.txt'

# Change to directory this script is in (for cron etc)
cd $(dirname $0) || { echo 'Failed to change directory, giving up'; exit 1; }                              

# Explanations
#-sv: simulate verbose for testing
#--playlist-items 1-3: first few only for testing
#--restrict-filenames: replace special characters in case need to transfer to Windows etc
#--no-overwrites: do not overwrite existing files
#--continue: resume partially downloaded files
#--ignore-errors: continue even if a video is unavailable (taken down etc)
#--ignore-config: don't read usual config files
#--download-archive $archive_file: use an archive file to avoid redownloading already-downloaded videos
#--yes-playlist: download the whole playlist, in case we pass a video+playlist link
#--playlist-reverse: may be necessary if index starts from most recent addition?
#--write-description: write video description to a .description file
#--write-info-json: write video metadata to a .info.json file
#--write-annotations: write annotations to a .annotations.xml file, why not
#--write-thumbnail: write thumbnail image to disk
#--write-sub: write subtitles (but not autogenerated)
#--embed-subs: also add them to the video file, why not
#--add-metadata: add metadata to video file

# Use --cookies to temporarily pass cookies (note must be in UNIX newline format, use notepad++ to convert)
# fix youtube-dl not working with cookies in python2
# https://github.com/ytdl-org/youtube-dl/issues/28640
python3 /usr/bin/youtube-dl \
--cookies "$cookies_file" \
--batch-file "$batch_file" \
--output "$filename_format" \
--format "$quality" \
--user-agent "$user_agent" \
--source-address "$source_IP" \
--max-filesize "$max_filesize" \
--limit-rate "$rate_limit" \
--sleep-interval "$sleep_min" \
--max-sleep-interval "$sleep_max" \
--restrict-filenames \
--no-overwrites \
--no-warnings \
--continue \
--ignore-errors \
--ignore-config \
--download-archive "$archive_file" \
--yes-playlist \
--playlist-reverse \
--write-description \
--write-info-json \
--write-annotations \
--write-thumbnail \
--write-sub \
--sub-lang en \
--embed-subs \
--add-metadata

Code language: Bash (bash)

You'll need the wonderful youtube-dl to run this. Should be fairly self-explanatory, but there's a few bits I find especially useful.

I limit video quality to the best up-to-1080p possible, since 4K videos can be huge and I'm not fussed for an archive. I also put a hard limit on filesize to avoid downloading any 10-hour videos, but you have the option to get them in lower quality instead. I keep the URLs to download in a separate file: these can be individual videos, entire channels or playlists, one on each line.

You can make your own playlists unlisted if you don't want them public but still want to be able to download them with this script. Unfortunately there is one case where this doesn't work – your liked videos playlist is always private and can't be changed. youtube-dl does let you pass in the username and password to your Google account but I find this rarely works, so instead you can export your YouTube cookies (using something like this extension on a YouTube page), dump them in a .txt file and point youtube-dl to them. It's probably sensible to clone your browser's useragent too, and set some rate limits to not abuse their hospitality too much.

Since some videos will inevitably be geo-restricted and I have a few IPs pointing to my box that geolocate to different countries, I'll occasionally let it do a run from somewhere else to sweep up any videos that might have been missed.

Although I save metadata anyway, I try to make the output format descriptive enough that I could live without it. I save each video to a folder named for its playlist/channel, and name the video with its position in the playlist, title, video ID and upload date. Reversing the playlist order means the position index starts from the first video added to the playlist – otherwise when more videos are added, the latest becomes the new number 1 and your index becomes useless.

Next post: doing something with them!

Download YouTube videos quickly in countries with slow international links

My local ISP recently installed fibre in town, which freed us up from the horror that is 700kbit WiMAX connections. The sales rep came round and enthusiastically encouraged us to upgrade to an "up to 100mbit" plan, which turned out to be shared with the entire town.

Yep.

So in practice we get about 1mbit for international traffic, though national traffic is pretty fast at 8-25mbit. Google and Akamai have servers in Madagascar so Google services are super fast, Facebook works great and Windows updates come through fairly quickly, but everything else sorta plods along.

Spotify, Netflix and basically anything streaming are out, but YouTube works perfectly, even in HD, as long as you immediately refresh the page after the video first starts playing. It seems that the first time someone loads a video, it immediately gets cached in-country over what I can only assume is a super-secret super-fast Google link. The second time, it loads much quicker.

This is great in the office, but if you want to load up some videos to take home (internet is way too expensive to have at home) you're going to want to download them. I'm a big fan of youtube-dl, which runs on most OSs and lets you pick and choose your formats. You can start it going, immediately cancel and restart to download at full speed, but you have to do it separately for video and audio and it's generally pretty irritating. So here's a bit of bash script to do it for you!

First install youtube-dl and expect if you don't have them already:

sudo apt-get install youtube-dl expect

Then add something like this to your ~/.bashrc:

yt()
{
expect -c 'spawn youtube-dl -f "bestvideo\[height<=480\]/best\[height<=480\]" -o /home/user/YouTube/%(title)s.f%(format_id)s.%(ext)s --no-playlist --no-mtime '"$1"'; expect " ETA " { close }'
expect -c 'spawn youtube-dl -f "worstaudio" -o /home/user/YouTube/%(title)s.f%(format_id)s.%(ext)s --no-playlist --no-mtime '"$1"'; expect " ETA " { close }'
youtube-dl -f "bestvideo[height<=480]+worstaudio/best[height<=480]" -o "/home/user/YouTube/%(title)s.%(ext)s" --no-playlist --no-mtime $1
}

Run bash to reload and use it like yt https://youtube.com/watch?v=whatever

The first two expect commands start downloading the video and audio respectively (I limit mine to 480p or below video and the smallest possible audio, but feel free to change it), killing youtube-dl as soon as they see " ETA " which appears once downloads start. The third command downloads the whole thing once it's been cached in-country.

The reason we include the format ID in the filename for the first two commands is because when downloading video and audio together, youtube-dl adds the format code to the temporary files as title.fcode.ext. When downloading just video or just audio, these aren't included by default. By adding these ourselves, the third command will resume downloading from the existing files and remove them automatically after combining them into one file.

I like to include --no-mtime so the downloaded files' modification date is when they were downloaded, rather than when the video was uploaded. This means I can easily delete them after a month with a crontab entry:

0 21 * * Sun root find /home/user/YouTube/ -type f -mtime +31 -print -delete

Ignore the running as root bit, it's on a NAS so everything runs as root. Woo.